Showing posts with label Selenium Webdriver. Show all posts

Sunday, February 4, 2018

Adding dependencies to maven for selenium

To add dependencies in maven project for running selenium tests, we can add dependencies under dependencies section as shown below:


1. Go to https://mvnrepository.com

2. Add Below dependencies:

a. TestNG
<dependency>
    <groupId>org.testng</groupId>
    <artifactId>testng</artifactId>
    <version>6.13.1</version>
    <scope>test</scope>
</dependency>

b. Selenium-java
<dependency>
    <groupId>org.seleniumhq.selenium</groupId>
    <artifactId>selenium-java</artifactId>
    <version>3.8.1</version>
</dependency>

c. Selenium chrome driver
<dependency>
    <groupId>org.seleniumhq.selenium</groupId>
    <artifactId>selenium-chrome-driver</artifactId>
    <version>3.8.1</version>
</dependency>

3. All the other dependencies related to selenium can be found at:
http://www.mvnrepository.com/artifact/org.seleniumhq.selenium

4. The dependencies are associated with the tests and downloaded at m2 folder in users folder
Saturday, June 17, 2017

How to execute only failed TestNG tests in Eclipse

While running testNG suite, once we are done with one round of execution of tests in the test suite, It can be helpful to execute only the failed tests during the first round of execution to reduce test failures due to flakiness/synchronization issues.

Below steps shows how to achieve this in eclipse.

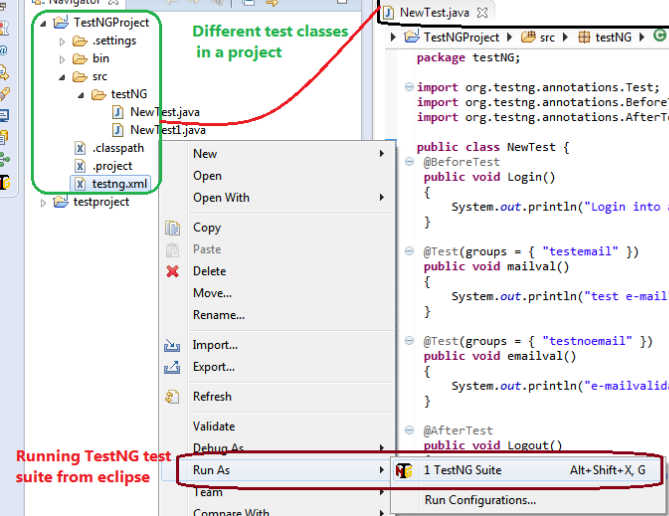
  • Run the required test suite through eclipse as shown below.
testng eclipse run
  • Once the execution is completed and there are failures in the execution, we may require to rerun the tests.
  • Refresh the project. folder test-output should be displayed in the project explorer.
  • File testng-failed.xml should be available in the folder.
  • Run the test suite in similar manner as shown above, i.e Run As TestNG suite.

Saturday, April 22, 2017

Switching between multiple frames in selenium


There can be multiple iframes in a webPage. To perform action on webelements in a frame, we need to first identify the frame and then perform action on the element.
We can switch to a particular frame based on the below identifiers:


By Index: The index depends on the order of frame in the Page. A numeric value is assigned to the frame based on the order in which it appears in the page.

driver.SwitchTo().Frame(0);

By Name: We can switch to a frame based on the name of the frame.

driver.SwitchTo().Frame("FrameName");

By Id: We can switch to a frame based on the id defined for the frame

driver.SwitchTo().Frame("FrameId");

Switch to a frame by locator for WebElement. In the below example frameElement is the locator for the frame

driver.switchTo().frame(frameElement);

e.g: 

driver.SwitchTo().Frame(driver.FindElement(By.CssSelector(cssfortheelement)));


Frame inside frames: There can be scenario in which there are frame inside of the parent frame.Please note in case of frame inside frame, we need to first switch to the outer frame, and then switch to the inner frame to perform action on the webelement.


To acess the main webPage and come out of the frame, below code is used

driver.SwitchTo().DefaultContent()

Friday, April 21, 2017

How to get text of an alert message in Selenium Webdriver: Mini-blogs

An alert message appears at times to notify the users of the alert as shown below. Using selenium webdriver, we can capture the text in the alert message using selenium web driver.


Using below two lines of code, we can get the alert message.


Alert alert = driver.switchTo().alert();
alert.getText();

Tuesday, December 6, 2016

Tutorials to understand TestNG for Selenium Webdriver

Installing TestNG in eclipse - This post explains how to install TestNG in eclipse.


MindMap for TestNG - Understanding the concept in TestNG using MindMap.


Annotations in TestNG - Different annotations used in TestNG 


Assertion and Soft Assertions in Selenium Webdriver using TestNG - What are different assertions and soft assertions in selenium webdriver. What is the difference between assertions and soft assertion. How to use assertion in the test.


Maven POM.xml: Dependencies for Selenium, TestNG and junit - How to add TestNG dependenies in maven project.


Using dependencies and priority in TestNG tests: Ordering tests execution - how to define dependencies between tests and priotising order of tests execution in TestNG.


Creating TestNG.xml to run Selenium test suites - How to create testNG xml file for executing testsuite in TestNG. This article explains, how to create xml file for execution in  different scenarios.


How to run multiple test suites in TestNG? - Suppose we have individual suite for different module. This article explains how to create testNG xml file to run multiple test suites.


Maven POM.xml: Dependencies for Selenium, TestNG and junit - How to add dependencies for TestNG in Maven POM.xml

Saturday, November 19, 2016

Understanding and locating Locators in Selenium IDE

What is meant by Locator in Selenium

Selenese commands are executed on the target element. The target element is defined in the web application based on the locators. For example, suppose there is an link in the page with id as homepage, the link element will be located and identified by ‘id=homepage’ and then we can execute click command on the link homepage identified by locator ‘id=username’.

What are different locator types in Selenium IDE

The various locator types in Selenium IDE are as follows: 

  • Locating elements by ID – an element can be identified using the ‘id’ attribute defined for the object. Since it is assumed that id attribute is unique for an element in the page, hence element will be uniquely identified in the page using id attribute for target. E.g. ‘id=iamunique’.
  • Locating elements by name – In case id attribute is not defined for the target element, we can identify the element using name attribute in the target. E.g. ‘name = sonamgupta’. In case of object is not identified uniquely by name locator, we can use multiple locators like ‘name = sonamgupta value = bewafahai’ to uniquely identify the element.
  • Locating elements by link text – For link element, we can identify an element using link text in the target. e.g. ‘link =loginkaro’ will identify a link with text as loginkaro.
  • Locating elements by XPath – We can also use XPath to identify an element in the page. XPath allows us to query the DOM structure of the page like a XML document. For e.g. //input will find first input box in the page and perform action on the same. Can use firepath/firebug to uniquely identify the element xpath
  • Locating elements by css – Elements in the webpage can be identified using CSS selectors to find the objects that you need. Selenium is compatible with CSS 1.0, CSS 2.0, and CSS 3.0 selectors. Syntax for identifying an element using css is ‘css = CSS Selector’ for e.g. ‘css=input.kyabaathain’ where input is the tag name for element and kyabaathain is the classname. Both xpath and css are useful to identify elements with complex identifiers.

Tools to identify the attributes and locators for element in the webpage

We can identify element locators using different developer tools in different browsers. Below are some of the developer tools that help to identify objects in the page.
  • Firebug: Firebug is a Firefox developer add-on used to identify elements on the page by using the find functionality.
  • FirePath: It is a Firefox add-on used with firebug and helps in testing XPath and CSS on the page. Highlights all elements on the page that match the selector to your element location.
  •  IE Developer Tools: IE developer tools helps in identifying element. This is inbuilt with IE browser and can be launched by pressing F12.
  • Google Chrome Developer Tools: This is inbuilt in Google chrome and can be launched by Pressing F12.

Google developer tool

Friday, November 18, 2016

scrollIntoView JavaScriptExecutor - How to Scroll until element is visible

We can scroll to an element using Action class or JavaScript executor, Below code can be useful in case you encounter such a scenario in selenium Webdriver:


A. Using JavaSript Executor - scrollIntoView


Provide parameter value as true or false for scrollIntoView
true - Provide value as true if the element is below in the page from the current scroll position
false - Provide value as true if the element is below in the page from the current scroll position


WebElement webElement = driver.findElement(By.xpath("element xpath"));
((JavascriptExecutor) driver).executeScript("arguments[0].scrollIntoView(true);", webElement);
Thread.sleep(500); 


B. Using Actions - MovetoElement method


WebElement webElement = driver.findElement(By.xpath("element xpath"));
Actions actions = new Actions(driver);
actions.moveToElement(webElement);
actions.perform();

Friday, November 11, 2016

Exporting selenium IDE tests to WebDriver

Script created in Selenium IDE can be exported to WebDriver/Remote Control in the languages java/c#/python/ruby that can be run using junit(java), RSpec(ruby), nUnit and testNG. 


To export test in TestNG with selenium webdriver, follow below steps:

  • Record the required operations on the application.
  • Go to File>Export Test Case as Java / TestNG / WebDriver (can export test script in different formats)
Exporting test in Selenium IDE

  • Export the test.
  • A java file will be created with content as shown below


package com.example.tests;

import java.util.regex.Pattern;
import java.util.concurrent.TimeUnit;
import org.testng.annotations.*;
import static org.testng.Assert.*;
import org.openqa.selenium.*;
import org.openqa.selenium.firefox.FirefoxDriver;
import org.openqa.selenium.support.ui.Select;

public class TESTINGAA {
  private WebDriver driver;
  private String baseUrl;
  private boolean acceptNextAlert = true;
  private StringBuffer verificationErrors = new StringBuffer();

  @BeforeClass(alwaysRun = true)
  public void setUp() throws Exception {
    driver = new FirefoxDriver();
    baseUrl = "https://www.google.co.in/";
    driver.manage().timeouts().implicitlyWait(30, TimeUnit.SECONDS);
  }

  @Test
  public void testINGAA() throws Exception {
    driver.get(baseUrl + "/?gfe_rd=cr&ei=_OMdWJKzEO3I8AeAqrBg&gws_rd=ssl");
    driver.findElement(By.id("lst-ib")).clear();
    driver.findElement(By.id("lst-ib")).sendKeys("TESTING AUTOMATION CONEPTS");
    assertTrue(isElementPresent(By.linkText("TESTING AUTOMATION CONCEPTS")));
    driver.findElement(By.linkText("TESTING AUTOMATION CONCEPTS")).click();
    driver.findElement(By.linkText("Test automation - Wikipedia")).click();
    assertTrue(isElementPresent(By.linkText("Test automation - Wikipedia")));
  }

  @AfterClass(alwaysRun = true)
  public void tearDown() throws Exception {
    driver.quit();
    String verificationErrorString = verificationErrors.toString();
    if (!"".equals(verificationErrorString)) {
      fail(verificationErrorString);
    }
  }

  private boolean isElementPresent(By by) {
    try {
      driver.findElement(by);
      return true;
    } catch (NoSuchElementException e) {
      return false;
    }
  }

  private boolean isAlertPresent() {
    try {
      driver.switchTo().alert();
      return true;
    } catch (NoAlertPresentException e) {
      return false;
    }
  }

  private String closeAlertAndGetItsText() {
    try {
      Alert alert = driver.switchTo().alert();
      String alertText = alert.getText();
      if (acceptNextAlert) {
        alert.accept();
      } else {
        alert.dismiss();
      }
      return alertText;
    } finally {
      acceptNextAlert = true;
    }
  }
}

Saturday, November 5, 2016

Using dependencies and priority in TestNG tests: Ordering tests execution

Suppose there are three tests in a test class which needs to be executed, we can define the tests in the class as shown below:


public class TestOrder {
@Test
public void TestA() {
System.out.println("test a");
}

@Test
public void TestB() {
System.out.println("test b");
}

@Test
public void TestC() {
System.out.println("test c");
}
}


When we execute the test class, all the three tests are executed, but order of the test is not sure. We can prioritize the test using priority.


public class TestOrder {
@Test(priority=1)
public void TestA() {
System.out.println("test a");
}

@Test(priority=2)
public void TestB() {
System.out.println("test b");
}

@Test(priority=3)
public void TestC() {
System.out.println("test c");
}
}


Since there can be many tests in a test suite, and it can be difficult to prioritize tests based on numbering tests. In such cases,we can prioritize the tests based on dependsongroup or dependsonmethod as shown below.  Using groups, we can group the tests based on functionality and scope of the tests


public class TestOrder {
@Test(groups = { "smoke" })
public void TestA() {
System.out.println("test a");
}

@Test(dependsOnMethods = { "TestD" }, groups = { "regression" })
public void TestB() {
System.out.println("test b");
}

@Test(dependsOnGroups = { "smoke" })
public void TestC() {
System.out.println("test c");
}

@Test
public void TestD() {
System.out.println("test d");
}
}

How to run multiple test suites in TestNG?

Suppose we have individual test suite for different features/modules in TestNG, we can run multiple testNG test from a master suite xml file by calling the individual tests as shown below:


<?xml version="1.0" encoding="UTF-8"?>
<!DOCTYPE suite SYSTEM "http://testng.org/testng-1.0.dtd" >
<suite name="MainTestSuite">
    <suite-files>
        <suite-file path="suiteFeatureA.xml" />  
        <suite-file path="suiteFeatureB.xml" /> 
        <suite-file path="suiteFeatureC.xml" />  
        <suite-file path="suiteFeatureD.xml" />      
    </suite-files>
</suite>


This way, we can run multiple test suites from a master suite file in TestNG.

Thursday, November 3, 2016

Handling authentication popup in Selenium WebDriver

In case of login into an application in selenium, an alert pop may be displayed authenticating for user credential. The pop-up can be web based or windows based popup.

Web Based Authentication pop-up can be handled using alert class as shown below:

// provide a wait condition for alert to be present
WebDriverWait wait = new WebDriverWait(driver, 30);
Alert alert = wait.until(ExpectedConditions.alertIsPresent());
//Using alert.authenticateUsing, provide username and password for http alert popup     
alert.authenticateUsing(new UserAndPassword( ** username ** , ** password ** ));

Or else, can try the below code and see it works:

driver.Navigate().GoToUrl("http://UserName:Password@testingmail.com");

This was about web-based pop-up, In case a windows pop-up appears asking for username and password, An autoIT script can be created to handle the windows pop-up.
  • Create an au3 file for handling the pop-up.
  • Compile the au3 file using AutoIT script  to exe converter.
autoit script converter

  • Run the autoIT exe file using below code in selenium.

Runtime.getRuntime().exec("d:\\AuthenticateAutoIt.exe");		

Sunday, September 25, 2016

Switching to frame, Windows, alert in Selenium WebDriver

1. How to Switch from one frame to another

 // How to Switch from one frame to another  
 WebElement iFrmeElement = driver.findElement(By.xpath("xPath for Frame"));  
 driver.switchTo().frame(frameElement);  
 //Or  
 driver.switchTo().frame(id or name)  
 //Or  
 driver.switchTo().frame(index of frame)  

2. We can switch to default again by:

 driver.switchTo().defaultContent();  

3. We can switch to a window based on name, Id or Windows handle

 driver.switchTo().window("windowName");  

4. We can switch to an alert

 Alert alert = driver.switchTo().alert();  
 // We can close an alert using methods for alert object  
 alert. accept();  

Saturday, September 24, 2016

Extracting Tooltip text using Selenium WebDriver : Quick Codes

Tooltip displayed for an element is identifed based on the attribute title defined for the element. Knowing that title of the element is the tooltip resolves half of the problem.


Suppose there is an element with id as abcde, the tooltip of the element can be stored in a string using code as below: 

Tooltip example


//example 1: getting tooltip of the elemet 
String strToolTipText = driver.findElement(By.xpath("//input[@id='abcde']").getAttribute("title");

//example 2 : Validating tooltip is displayed correctly for an webElement 
public boolean verifyTooltipText(WebElement webElem, String expToolTiptext)
 {
  String acttooltiptext = webElem.getAttribute("title");
  if(acttooltiptext.contentEquals(exptooltiptext))
  {
  return true
  }
  else
  {
  return false
 }
}

Saturday, September 3, 2016

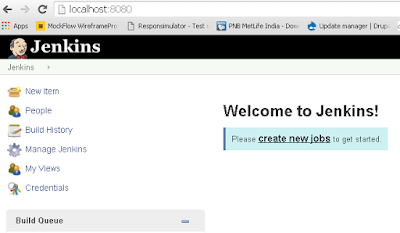
Jenkins setup on localhost server

 
  • Downloading Jenkins
    • Download Jenkins from Jenkins official site.
    • Jenkins.war will be downloaded.


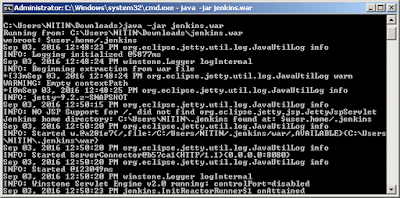
  • Go to command prompt and navigate to folder in which Jenkins is downloaded
  • Run below command in command prompt
  • java -jar jenkins.war


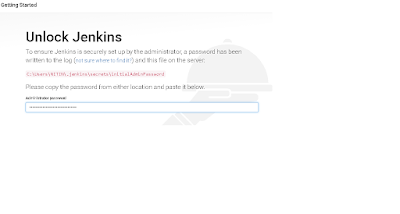
  • Navigate to localhost:8080 on the machine where jenkins is run. The page asks to provide the admin password and the location from where to copy the password.
  • Provide the Password


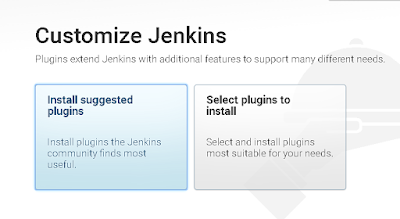
  • Select the suggested plugins to install


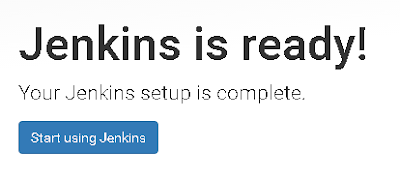
  • Now we can use Jenkins  

  • Jenkins set up is complete. Click on start using Jenkins for creating jobs.


  • Jenkins dashboard will be displayed

Monday, August 22, 2016

Tips for xpath identifcation for selenium

  • Importance of XPath in Selenium?

Selenium WebDriver identifies element based on locators. XPath is one of the most important locator used for identifying an element or group of elements. XPath uses path expressions to work with element in the application.

  •  Tools for identifying element using Xpath?

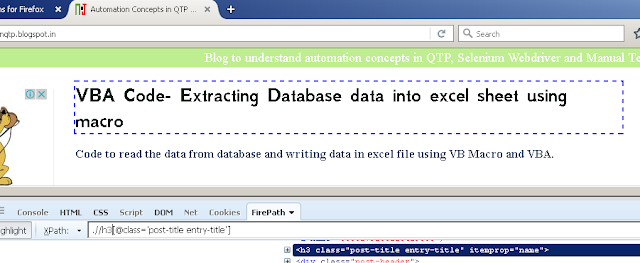
An element attribute can be identified by accessing developer toolbar (pressing F12 in browser windows) by in each of the browser.  There are add-ons/extensions which can be added in the browser.  One of the useful extensions for Firefox browser is downloading firebug followed by firepath and identifying elements using Xpath.


firepath for xpath

  • Xpath for the element in case the Id of the element is available
Xpath = “.//*[@id='gb_testing123']”

This will search for any element with id as 'gb_testing123'. In case there are various element in 
the page with id dynamically changing on each page load ,e.g: Id changes from gb_testing123 to 
gb_testing224. In such cases , we can have expression as :

Xpath = “.//*[contains(@id,'gb_testing')]” 

There may be multiple elements of different element type, Suppose there are different element type
and we want to restrict our xpath to a button element, we can modify the xpath in above expression 
as:

Xpath = “.//button[contains(@id,'gb_testing')]”

  • Xpath for the element in case the class of the element is available. 
Xpath = “//*[@class='gb_testing123']”
Or 
Xpath = “.//*[contains(@class,'gb_testing')]” 
Or 
Xpath = “.//div[contains(@class,'gb_testing')]”

  • Xpath for element in case of attribute value is available 
Xpath = “//*[@activated='1']”
Or
Xpath = “.//*[contains(@activated,'1')]” 
Or  
Xpath = “.//div[contains(@activated,'1')]”

  • Starts with Prefix for attribute value

//div[starts-with(@class,"gb_")]


  • Based on text displayed of the element

//*[text()='Software Testing Tutorial']


  •  Identifying element based on multiple attribute value


a. Xpath for element using combination of different attribute in AND condition
.//div[contains(@id,'hdtb')][@class='hdtbna notl']
Or
.//div[contains(@id,'hdtb')  and @class='hdtbna notl']


b. Xpath for element using combination of different attribute in OR condition
.//*[contains(@id,'hdtb') or @class='hdtbna notl']


  • Identifying xpath using different element types matching either A or B.


//a[contains(@id,'hdtb')]|//div[@class='hdtbna notl']

This will return element which are either links containing id as hdtb or 
div objects with class as 'hdtbna notl'


  • Child element of object type


//div[@id='viewport']/div
 This will return the immediate div elements in the div with id as viewport
//div[@id='viewport']//div
 This will return all the  div elements inside the div with id as viewport
//div[@id='viewport']/div[5]
 This will return the fifth div element immediate child inside the div with id as viewport


  • Parent element


//div[@class='rc']/.. 
 This will return the parent element
//div[@class=’rc’]/../a 
 Sibling link element to the div with class as rc.

Monday, August 15, 2016

Quick Code - How to right click an element and select menu option with selenium

Using action, we can perform right click(context click) operation on an object in selenium and also select the menu option using Arrows.down key press as shown in the code below:


Right click and select menu option


Quick Code:


public static void contextMenuSelection(WebElement webElem, int iOption)
      {
 //create an instance of actions class
       Actions action = new Actions(driver); 
 //context click (right click) the element
       action.contextClick(webElem);
       for(int i =1;i<=iOption;i++) 
       {
     //Press send keys for arrow down
        action.sendKeys(Keys.ARROW_DOWN);
       }
 //Press Enter send keys and build and perform the action.
       action.sendKeys(Keys.ENTER).build().perform();
      }

Saturday, July 30, 2016

Quick Codes- Validating element existence in Selenium Wedriver


In this article, one of the way to validate existence of multiple objects of same object type based on element text in the application is explained using Selenium Webdriver with java. Please share other better way to verify element existence using Selenium Webdriver.


public boolean IsElementExists(String ObjectType, String strElemText)
{
 boolean boolElemExists = false;
//In case of multiple objects which needs to be validated, Provide multiple objects
// text seperated by  | in strElemText. e.g: strElemText as "mail|inbox"
// Create an array by splitting array based on delimiter "|"
 String[] elemTextArray = strElemText.split("|");
// Loop through array elements
 for ( int j = 0;j<elemTextArray.length;j++)
 {
  List<WebElement> lstElement = null;
  try
// Better approach will be to pass values from enum for Object type
   switch (ObjectType)
   {
   // in case of link object storing all the elements of type link in lstElement
   case "Link":
     lstElement = driver.findElements(By.tagName("a")); 
    break;
    // in case of link object storing all the elements of type link in label
   case "Label":
    lstElement = driver.findElements(By.tagName("label")); 
    break;
   }
   for (int i=0;i<lstElement.size();i++)
   {
    if (lstElement.get(i).getText().contentEquals(strElemText.trim()))
      {
       boolElemExists = true;
       i= lstElement.size()-1;
      }
   }
   if (boolElemExists = false)
   {
    return false;
   }
   }
  catch(Exception e)
  {
   return false;
  }
 }
 return boolElemExists;
}

Tuesday, July 26, 2016

Quick Codes -How to highlight element using Selenium WebDriver

This code snippet shows one of the way to highlight an element using JavaScript executor in Selenium WebDriver. Please share your inputs on other ways to highlight an element using Selenium.


package testingqaautomation; 

import org.junit.Test;
import org.openqa.selenium.By;  
import org.openqa.selenium.JavascriptExecutor;  
import org.openqa.selenium.WebDriver;  
import org.openqa.selenium.WebElement;  
import org.openqa.selenium.firefox.FirefoxDriver;  
 
 public class HighlightWithJE {  
      static WebDriver driver; 
      @Test
      public void Testing() throws InterruptedException {  
  // Connect to the firefox driver server 
  driver = new FirefoxDriver(); 
  //maximise the browser   
  driver.manage().window().maximize();   
  //Navigate to the application, change url to a valid url
  driver.navigate().to("https://www.seleniumbites.blogspot.com");  
  //find element to highlight, select a valid element
  WebElement linkElem = driver.findElement(By.linkText("Gmail"));  
  //create instance of javascript executor
  JavascriptExecutor js = (JavascriptExecutor) driver; 
  //highlight the element to green color and wait
  //for 3 sec and then click the element
  js.executeScript("arguments[0].setAttribute('style','border: solid 8px green')", linkElem);   
  Thread.sleep(3000);  
  js.executeScript("arguments[0].setAttribute('style', arguments[1]);", linkElem, "");  
  linkElem.click();            
      } 
}   

Saturday, July 23, 2016

Installing TestNG in eclipse


TestNG is a testing framework used to design automated functional/unit tests in Java. Eclipse is one of the most popular IDE for developing tests in Java. In this article, we will understand how to set up/install testNG with Eclipse.


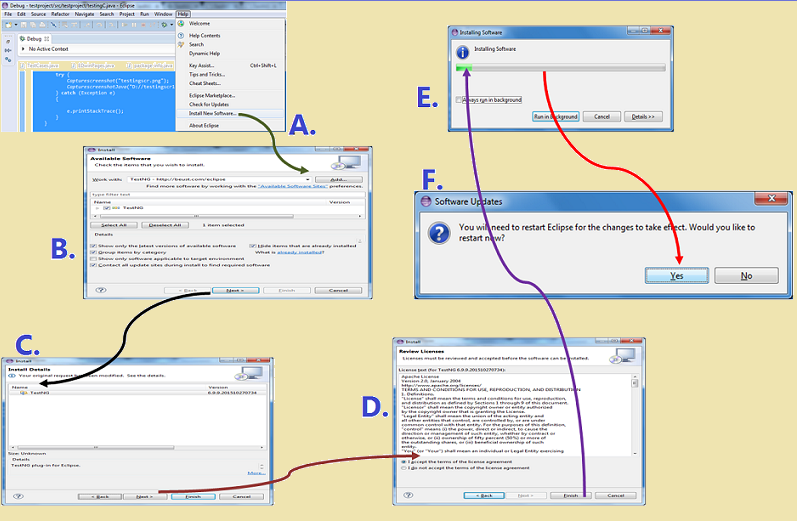
A. Launch Eclipse IDE and Navigate to Help>Install new Software. A pop-up page with title as Install will be displayed.


B. Set http://beust.com/eclipse in Work With Input box and click on Add Button.


C. Checkbox for TestNG is displayed in the Page. Select checkbox and click on Next.


D. Agree to the license agreement.


E. Software download will begin and TestNG will be installed.


F. Once TestNG installation is done, a pop-up window will be displayed asking to restart eclipse for changes to take place. Click on Yes to complete TestNG installation


Installing testNG in eclipse


Another way to install TestNG in eclipse is to navigate to Help>Eclipse Marketplace and search for TestNG. Install TestNG from the search results.


Installing testNG in eclipse marketplace