Sunday, December 17, 2017

Sending keys in selenium


In Selenium, we are send specific keys from the keyboard like Enter or F2 on WebElement using import org.openqa.selenium.Keys as shown below:


import org.openqa.selenium.Keys

WebElement.sendKeys(Keys.ENTER)

Below is the list of enum constants defined for enum Keys, which we can send on an element in selenium:


ADD 
ALT 
ARROW_DOWN 
ARROW_LEFT 
ARROW_RIGHT 
ARROW_UP 
BACK_SPACE 
CANCEL 
CLEAR 
COMMAND 
CONTROL 
DECIMAL 
DELETE 
DIVIDE 
DOWN 
END 
ENTER 
EQUALS 
ESCAPE 
F1 
F10 
F11 
F12 
F2 
F3 
F4 
F5 
F6 
F7 
F8 
F9 
HELP 
HOME 
INSERT 
LEFT 
LEFT_ALT 
LEFT_CONTROL 
LEFT_SHIFT 
META 
MULTIPLY 
NULL 
NUMPAD0 
NUMPAD1 
NUMPAD2 
NUMPAD3 
NUMPAD4 
NUMPAD5 
NUMPAD6 
NUMPAD7 
NUMPAD8 
NUMPAD9 
PAGE_DOWN 
PAGE_UP 
PAUSE 
RETURN 
RIGHT 
SEMICOLON 
SEPARATOR 
SHIFT 
SPACE 
SUBTRACT 
TAB 
UP 
ZENKAKU_HANKAKU 
For further details, please see the Page: https://seleniumhq.github.io/selenium/docs/api/java/org/openqa/selenium/Keys.html

Sunday, September 24, 2017

Arrays in Java basics for selenium


1. We can assign value to an element in array as shown below:

testing[3] = 43; or all the elements can be defined in a go like shown below:
int[] testing1= {10,20,30,40,50,60,70,80,90,100};

2. We can extract all the values in an array using for each loop as shown below:

 int[] testing1 = { 10, 20, 30, 40, 50, 60, 70, 80, 90, 100 };
 for (int test : testing1) {
     System.out.println(test);
 }

3. The same information can be extracted using for loop can be found as shown below:

for (int i = 0; i < testing1.length; i++) {
     System.out.println(testing1[i]);
 }

4. Using length property, we can find the size of any array


e.g. System.out.println(testing1.length)

4. We can pass an array as a parameter to a method, and also return value from a method:

5. We can sort an array in ascending order using sort();

Arrays.sort(testing1);

6. We can fill values in all the array elements using fill() menthod 
Arrays.fill(testing1, 385);

7. We can compare two arrays using arrays.equals

boolean isArrSame = Arrays.equals(testing1, testing);
System.out.println(isArrSame);

Sunday, July 23, 2017

Code to open firefox with selenium 3.4 using GeckoDriver 1.8


package test;

import org.openqa.selenium.WebDriver;
import org.openqa.selenium.firefox.FirefoxDriver;
import org.openqa.selenium.remote.DesiredCapabilities;

public class testing {

    public static void main(String[] args) throws InterruptedException {
 // Download the geckodriver based on the firefox if it is 32 bit or 64
 // bit installed in the machine
 // Save the driver and provide path of the exe for geckodriver
 System.setProperty("webdriver.gecko.driver", "E:\\Selenium\\geckodriver-v0.18.0-win64\\geckodriver.exe");
 // define the capabilities of firefox browser with marionette set as true
 DesiredCapabilities capabilities = DesiredCapabilities.firefox();
 capabilities.setCapability("marionette", true);
 // create an instance of firefox driver
 WebDriver driver = new FirefoxDriver(capabilities);
 driver.get("http://www.rediff.com");
 driver.quit();
    }
}

Saturday, July 22, 2017

Switch between Windows using switch to in Selenium


String MainWinHandle = driver.getWindowHandle();
for(String NewWinHandle : driver.getWindowHandles()){
// Ignore the parent window open and work with the new window frame
 if(!NewWinHandle.equals(MainWindowHandle))
  {
    driver.switchTo().window(NewWinHandle);
 //Perform the required tasks to be performed in the new window opened
 driver.close();
 }
}
//Perform action on the main window once the task is completed with the old window.
driver.switchTo().window(MainWinHandle);

Thursday, July 20, 2017

Job creation in Jenkins: Workflow

Below are the steps to create a new job in Jenkins:

1. Launch Jenkins by providing the url and port number of Jenkins Server. 

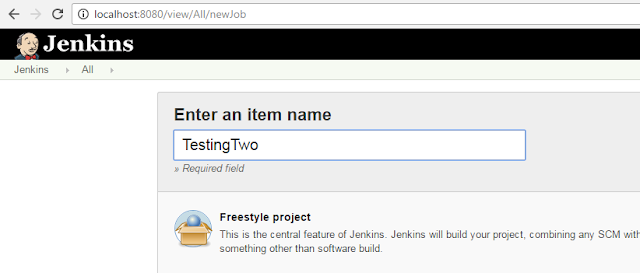
2. Click on New Item to create a new Jenkins Job. Provide the jenkins Job Name and select the project type. Let us select a freestyle project.

New job Jenkins
3. There are different sections in the jenkins Job which are shown below.

4. Below Flowchart explains the different information we can provide in a jenkins job and what is the role of different sections in a jenkins job.Jenkins job creation workflow

5. General Section:Job Description is provided in this section. Managing different build Information and adding Parameters used in job are some of the tasks which can be defined in this section. 

6. Source Code Management: This section provide instruction on how to extract latest code in the workspace,  from git, svn or local system.


Source Code Jenkins


7. Build Trigger : This section define how the job can be triggered, Whether it is dependent on existing job or is scheduled to run on a fixed time and date periodically.


build trigger Jenkins


Build Environment: This section manages the build environment or workspace with option to clean the workflow before build execution or abort/fail a build if it is struck at a step for long period.
build environment Jenkins 


Build - This is the main section where the actual batch files/ shell command or ant targets are invoked. For testing purpose , we can invoke a maven project in this section. Executing a job means executing the commands provided in the build section.

build Jenkins


Post Build Steps - These are post build steps and include activities like archiving artifact or sending a mail with build details or publishing testng/junit test results.

Post build Jenkins

Saturday, June 17, 2017

How to execute only failed TestNG tests in Eclipse

While running testNG suite, once we are done with one round of execution of tests in the test suite, It can be helpful to execute only the failed tests during the first round of execution to reduce test failures due to flakiness/synchronization issues.

Below steps shows how to achieve this in eclipse.

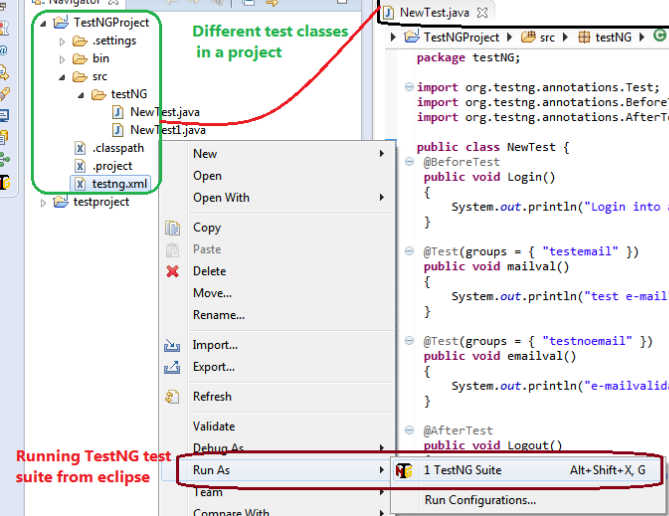
  • Run the required test suite through eclipse as shown below.
testng eclipse run
  • Once the execution is completed and there are failures in the execution, we may require to rerun the tests.
  • Refresh the project. folder test-output should be displayed in the project explorer.
  • File testng-failed.xml should be available in the folder.
  • Run the test suite in similar manner as shown above, i.e Run As TestNG suite.

Monday, May 15, 2017

Jenkins - Adding a conditional build step.

In Jenkins, at times we may require Jenkins to execute some build step on one condition and another in case of other condition. For e.g: It may be required to run a particular test/batch command on Weekdays and some other batch condition on weekends. We can create a job to perform different tasks based on the condition satisfied. 

To add a conditional build step, follow below steps in Jenkins.

  • Navigate to Jenkins>Manage Jenkins>Manage Plugins and go to available tab.
  • Search for Conditional buildstep as shown below and click on install without restart.
  • It will install the plugin and will show success once installation completes.
  • Now the plugin can be used in the Jenkins job as shown below.In the job, add build step as Conditional step (single)

  • Provide the conditional step from the list as shown below and execute the build command.


Saturday, May 13, 2017

WaitFor Commands for AJAX application in selenium ide


AJAX stands for Asynchronous JavaScript And XML. AJAX uses combination of browser built-in XMLHttpRequest to request data from a web server and JavaScript/HTML DOM to display/use the data. Due to asynchronous nature of request and response of the calls, there may be delay in element being displayed in the page after an action has been performed on another element in the page.


To wait for the element to appear in the page, there are different waitfor commands in selenium IDE, which waits for default timeout set up for the element to appear. So in case an element is not displayed straightway, waitfor commands can be used to resolve sync issues in selenium IDE.


Some commonly used waitfor commands are:

  • waitForAlertNotPresent/waitForAlertPresent
  • waitForElementPresent
  • waitForTextPresent
  • waitForPageToLoad
  • waitForFrameToLoad
  • clickandWait
There are lot of commands waiting for different conditions in selenium IDE, you can have a look at all the commands by writing waitfor in command and can use the relevant wait as per the scernario

Saturday, May 6, 2017

Reload configuration from disk - Jenkins

In case of migration of existing jobs from one Jenkins setup to another setup or removing old build information from the disk, we can use the option to reload configuration from disk in Jenkins. Below are the steps to be be followed to reload configuration from disk:


  • When we set up jenkins in a machine, there is a folder with name .jenkins in location c:/users/<UserName> folder.

  • When we open the .jenkins>jobs folder, we see the folders for the jenkins jobs we have created in jenkins. 

  • We can copy folders from another jenkins instance and paste in this folder. Similarly we can make changes in the logs information or builds information.

  • Once we have made the required changes in the jenkins set up. Open Jenkins using localhost:8080 (assuming you are on the jenkins server itself and 8080 is the port used for jenkins and is installed as a window service on the server. Else if accessing from a remote client machine, use the address <machine name>:<port number>

  • The jenkins home Page will open as shown below.
  • Click on Manage Jenkins and in the Manage Jenkins Page, click on Reload configuration from disk as shown below. This will reload the changes made in jenkins set up.

Saturday, April 22, 2017

Switching between multiple frames in selenium


There can be multiple iframes in a webPage. To perform action on webelements in a frame, we need to first identify the frame and then perform action on the element.
We can switch to a particular frame based on the below identifiers:


By Index: The index depends on the order of frame in the Page. A numeric value is assigned to the frame based on the order in which it appears in the page.

driver.SwitchTo().Frame(0);

By Name: We can switch to a frame based on the name of the frame.

driver.SwitchTo().Frame("FrameName");

By Id: We can switch to a frame based on the id defined for the frame

driver.SwitchTo().Frame("FrameId");

Switch to a frame by locator for WebElement. In the below example frameElement is the locator for the frame

driver.switchTo().frame(frameElement);

e.g: 

driver.SwitchTo().Frame(driver.FindElement(By.CssSelector(cssfortheelement)));


Frame inside frames: There can be scenario in which there are frame inside of the parent frame.Please note in case of frame inside frame, we need to first switch to the outer frame, and then switch to the inner frame to perform action on the webelement.


To acess the main webPage and come out of the frame, below code is used

driver.SwitchTo().DefaultContent()

Friday, April 21, 2017

How to get text of an alert message in Selenium Webdriver: Mini-blogs

An alert message appears at times to notify the users of the alert as shown below. Using selenium webdriver, we can capture the text in the alert message using selenium web driver.


Using below two lines of code, we can get the alert message.


Alert alert = driver.switchTo().alert();
alert.getText();

Saturday, April 8, 2017

How to identify and close window alert using selenium

At times in browser,Alert box with a specified message and an OK button is displayed to ensure information comes through to the user. 

Alert box prevents the user from accessing other parts of the page until the box is closed. An alert is displayed is as shown below:

an example of alert window

While automating the web application, we can handle the pop up using alert Interface
The alert() method displays an alert box with a specified message and an OK button.

Below code shows how to close an window alert pop up using selenium:


public void Accept_Alert_Message() {
    try {
  //Using webdriver wait, we will wait for the alert
  //to appear before performing action on the alert
        WebDriverWait driverwait = new WebDriverWait(driver, 5);
        driverwait.until(ExpectedConditions.alertIsPresent());
  //switch to the alert element
        Alert alert = driver.switchTo().alert();
  //accept the alert displayed
        alert.accept();
  //switch to the default content
  driver.switchTo().defaultContent();
    } catch (Exception e) {
     // in case alert is not displayed, the code will go to catch loop
    }
}

Tuesday, March 14, 2017

How to select values in dropdown using select in Selenium


  •  How to define an element of type dropdown or tag as select: We can define a element of type dropdown using the statement as shown below:             


Select selectElement = new Select(driver.findElement(By.id("SelectApp")));

  • Example of Select tag in html page: Below example shows how the values are defined in a select dropdown.


<select id="SelectApp">
<option value="Facebook">FB</option>
<option value="TasteBook">TB</option>
<option value="ClassBook">CB</option>
<option value="HomeBook">HB</option>
<option value="TestBook">TTB</option>
</select>


  • SelectByValue would select the option from the dropdown for option: <option value="Facebook">FB</option> if provided. selectByValue: Selects value based on argument value for the tag.

 selectElement.selectByValue("Facebook");  

  • selectByVisibleText: Select value based on the text of the tag


selectElement.selectByVisibleText("FB");        

  • selectByIndex: select the fifth dropdown using selectByIndex


 selectByIndex.selectByIndex(4);              

Sunday, February 26, 2017

Importing jobs from one jenkins installation to another

Using Job import plugin, we can import Jenkins job from another machine to our machines. This is useful in migrating jobs from one setup to another or a new Jenkins setup. 

Below are the steps to copy jobs from one Jenkins set up to another.

  • We require Job Import plugin to be installed to import job from one machine to another. In case plugin is not installed, Go to Manage Jenkins > Manage Plugins. 
  • Click on Available tab and search for Job import plugin.

  • Select the checkbox and click on Install without restart.
  • Once Jenkins is installed, Job Import plugin will be displayed in the menu.
  • Next to import the jobs from another Jenkins URL, click on Job Import plugin
  • Provide the Remote Jenkins URL and credential to connect to Jenkins and click on Query!
  • Once we click on Query!, Jenkins job will be displayed from the remote Jenkins.
  • Select jobs to be imported and click on import.
  • Jobs will be imported once user clicks on Import.

Saturday, February 25, 2017

How to run Jenkins on port other than 8080

By default Jenkins start at port 8080, but at times port 8080 is already used by some other application. We can run Jenkins on port other than 8080 by following below steps:
  • In case jenkins is running through command prompt, we can start jenkins to run at port 9090 or any other port using below command:
java -jar jenkins.war --httpPort=9090
  • To change the port permanently, follow below steps:
    • Go to jenkins home folder. The jenkins home folder is usually at C:\Program Files (x86)\Jenkins in case jenkins is installed from microsoft installer (MSI) file or it can be c:\Users\<UserName>\.jenkins folder.
    • Open the jenkins.xml file.
    • Change the port number in the file to the required port number.
    • Save the file.
    • Restart the window service for jenkins.

Friday, February 24, 2017

Jenkins - Cloning an existing job in jenkins

We can clone an existing job in Jenkins using the steps below. Copying a Jenkins job is useful in case there is minor changes in the two job configurations.

Steps to be followed:
  • In Jenkins, we can see all the existing jobs in the dashboard and option to create a new job by clicking on New Item
Jenkins - cloning existing job
  • On clicking on new Item, a new page will be displayed to select project type and name of the item. Provide the name for the item.

Jenkins - cloning existing job
  •  In the bottom of the page, there is a option to copy from existing item. Provide the existing job name and click on OK.
Jenkins - cloning existing job
  •  The new job will be created and displayed in the dashboard. Make necessary changes in the job and save.
Jenkins - cloning existing job