Showing posts with label Selenium Frameworks. Show all posts

Tuesday, March 14, 2017

How to select values in dropdown using select in Selenium


  •  How to define an element of type dropdown or tag as select: We can define a element of type dropdown using the statement as shown below:             


Select selectElement = new Select(driver.findElement(By.id("SelectApp")));

  • Example of Select tag in html page: Below example shows how the values are defined in a select dropdown.


<select id="SelectApp">
<option value="Facebook">FB</option>
<option value="TasteBook">TB</option>
<option value="ClassBook">CB</option>
<option value="HomeBook">HB</option>
<option value="TestBook">TTB</option>
</select>


  • SelectByValue would select the option from the dropdown for option: <option value="Facebook">FB</option> if provided. selectByValue: Selects value based on argument value for the tag.

 selectElement.selectByValue("Facebook");  

  • selectByVisibleText: Select value based on the text of the tag


selectElement.selectByVisibleText("FB");        

  • selectByIndex: select the fifth dropdown using selectByIndex


 selectByIndex.selectByIndex(4);              

Friday, December 23, 2016

How to configure jenkins for user access without login authentication

In the previous article, we explain how to install Jenkins.  Jenkins setup on localhost server
Once Jenkins is installed, we can connect to Jenkins from localhost:8080 or <ServerName>:<Port Number> from the browser.

Once we open the url, It asks for username and password to connect to the jenkins server. In most cases, we require username/Password authentication to connect to the jenkins server as shown below:
:


However, In case we want everyone gets full access to the system and do not need to login , We can skip user authentication using below steps:
  • Navigate to .jenkins folder (Location: c:\users\<user acc>\.jenkins)
  • Open config.xml file in the folder.
  • set element<useSecurity> value as false.
  • Remove elements authorizationStrategy and securityRealm as shown below:
  • Restart Jenkins
  • Once Jenkins restart, acess localhost:8080 (check if port is same or different in your jenkins)
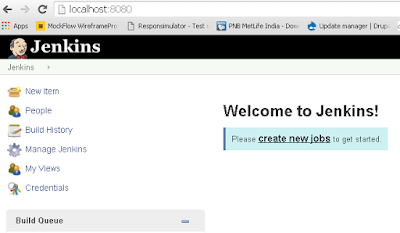
  • It will not ask for Username and password as shown below and jenkins dashboard will be displayed as shown below


Sunday, November 27, 2016

Validating conditions using assert and verify in Selenium IDE

The purpose of any automation/manual tests is to validate the application is working correctly and validating the actual outcome with the expected outcome for a condition.


  • Now the first question arises, what are the commands in selenium IDE which validates the outcome of condition There are different commands in different tools/automated suite. In selenium IDE, we can use assert or verify commands to validate the results.
  • Now the question two arises, what is the difference between assert and verify commands, When we use Assert command, it checks whether the given condition is true or false and stops further test execution if the assert statement fails. In case of verify command, in case the execution fails, the execution moves to next step in the test although the test is marked as failed.
  • Now coming to question three, when to use verify or assert command. In case of critical condition failing and no point to continue with test, use assert command. In case of minor condition failing in the test and we still wants to continue with further steps in the test, we can use verify statement.
  • So what is the next logical question in mind, when and how  to add the validation steps in test.Since Selenium IDE is a record and play tool,
    • Record execution flow. Once execution flow is recorded, we can add assertions in Selenium IDE.
    • Just right click the element on which the condition needs to be verified in Firefox browser e.g : Validating the text of the link. 
    • Click on the assertion to be added as shown below:

Add assertions selenium IDE


Similar to assert/verify commands in selenium IDE, we can use assert and soft.assert class for assert and verify command in Selenium Webdriver.

Friday, November 18, 2016

scrollIntoView JavaScriptExecutor - How to Scroll until element is visible

We can scroll to an element using Action class or JavaScript executor, Below code can be useful in case you encounter such a scenario in selenium Webdriver:


A. Using JavaSript Executor - scrollIntoView


Provide parameter value as true or false for scrollIntoView
true - Provide value as true if the element is below in the page from the current scroll position
false - Provide value as true if the element is below in the page from the current scroll position


WebElement webElement = driver.findElement(By.xpath("element xpath"));
((JavascriptExecutor) driver).executeScript("arguments[0].scrollIntoView(true);", webElement);
Thread.sleep(500); 


B. Using Actions - MovetoElement method


WebElement webElement = driver.findElement(By.xpath("element xpath"));
Actions actions = new Actions(driver);
actions.moveToElement(webElement);
actions.perform();

Tuesday, November 1, 2016

Creating TestNG.xml to run Selenium test suites.

TestNG is a testing framework used to design automated test suites for functional/unit tests in Java. Below are few reasons which makes TestNG, a strong framework for automation. 

  • TestNG provides annotations to distinguish tests from methods to be called before the test and after the tests.
  • TestNG provides assertions to validate test conditions.
  • TestNG provides data Provider annotation to create data driven automated tests.
  • TestNG test information is added in an xml file. We can easily create a suite of testNG tests in a master suite xml file and run the tests from eclipse or from Jenkins using ant files. 
  • XML file denotes a test or suite of tests to be executed.


Pre-condition: Below article are useful to setup and create first TestNG test in selenium.


Focus of this article:

  • Creating TestNG xml file to run test suite.
  • How to run TestNG xml file in eclipse.

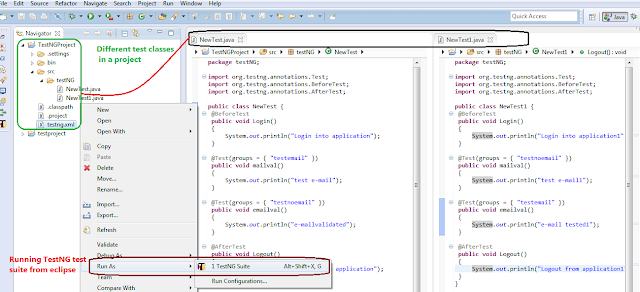
Let us take an example, suppose there are two classes in a Java Project.  we can create a test suite using testng xml file and run the test suite from eclipse as shown in the below image.


TestNG parallel test

Creating TestNG.xml file for different scenarios:

A. Run all the tests in both classes NewTest and NewTest1. This will execute all the methods with beforetest annotation in both the classes, followed by methods with test annotation, and then methods with afterTest annotation.

 <?xml version="1.0" encoding="UTF-8"?>  
 <!DOCTYPE suite SYSTEM "http://testng.org/testng-1.0.dtd">  
 <suite name="Suite1">  
  <test name="Test">  
   <classes>  
    <class name="testNG.NewTest"/>  
       <class name="testNG.NewTest1"/>  
   </classes>  
  </test>  
 </suite>  


B. Run test in class NewTest and then the methods in NewTest1 class:

 <?xml version="1.0" encoding="UTF-8"?>  
 <!DOCTYPE suite SYSTEM "http://testng.org/testng-1.0.dtd">  
 <suite name="Suite1">  
  <test name="Test1">  
   <classes>  
    <class name="testNG.NewTest"/>  
         </classes>  
  </test>  
  <test name="Test2">  
   <classes>  
    <class name="testNG.NewTest1"/>  
   </classes>  
  </test>  
 </suite>  

C. Executing all tests in a package with name as TestNG(Note: TestNG is the name of package in our example, it can be any name other than TestNG also)

 <?xml version="1.0" encoding="UTF-8"?>  
 <!DOCTYPE suite SYSTEM "http://testng.org/testng-1.0.dtd">  
 <suite name="Suite1">  
 <test name="Test1">  
   <packages>  
    <package name="testNG" />  
   </packages>  
  </test>  
 </suite>  

D. Executing all tests based on the group Name including and excluding specific tests

 <?xml version="1.0" encoding="UTF-8"?>  
 <!DOCTYPE suite SYSTEM "http://testng.org/testng-1.0.dtd">  
 <suite name="Suite1">  
 <test name="Test1">  
  <groups>  
   <run>  
    <include name="testemail"/>  
    <exclude name="testnoemail"/>  
   </run>  
  </groups>  
   <classes>  
    <class name="testNG.NewTest"/>  
    <class name="testNG.NewTest1"/>  
   </classes>  
 </test>  
 </suite>  

E. Executing specific methods by including methods in the class:

 <?xml version="1.0" encoding="UTF-8"?>  
 <!DOCTYPE suite SYSTEM "http://testng.org/testng-1.0.dtd">  
 <suite name="Suite1">  
 <test name="Test1">  
 <classes>  
   <class name="testNG.NewTest">  
    <methods>  
     <include name="emailval" />  
    </methods>  
   </class>  
   <class name="testNG.NewTest1"/>  
 </classes>  
 </test>  
 </suite>  

Saturday, September 24, 2016

Extracting Tooltip text using Selenium WebDriver : Quick Codes

Tooltip displayed for an element is identifed based on the attribute title defined for the element. Knowing that title of the element is the tooltip resolves half of the problem.


Suppose there is an element with id as abcde, the tooltip of the element can be stored in a string using code as below: 

Tooltip example


//example 1: getting tooltip of the elemet 
String strToolTipText = driver.findElement(By.xpath("//input[@id='abcde']").getAttribute("title");

//example 2 : Validating tooltip is displayed correctly for an webElement 
public boolean verifyTooltipText(WebElement webElem, String expToolTiptext)
 {
  String acttooltiptext = webElem.getAttribute("title");
  if(acttooltiptext.contentEquals(exptooltiptext))
  {
  return true
  }
  else
  {
  return false
 }
}

Saturday, September 3, 2016

Jenkins setup on localhost server

 
  • Downloading Jenkins
    • Download Jenkins from Jenkins official site.
    • Jenkins.war will be downloaded.


  • Go to command prompt and navigate to folder in which Jenkins is downloaded
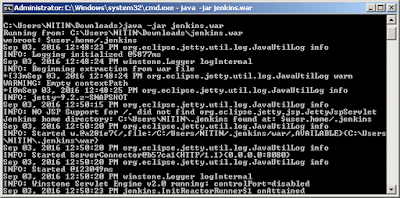
  • Run below command in command prompt
  • java -jar jenkins.war


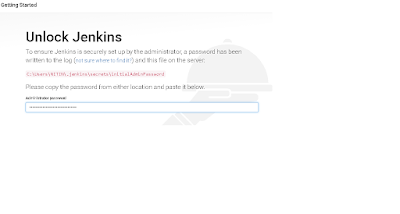
  • Navigate to localhost:8080 on the machine where jenkins is run. The page asks to provide the admin password and the location from where to copy the password.
  • Provide the Password


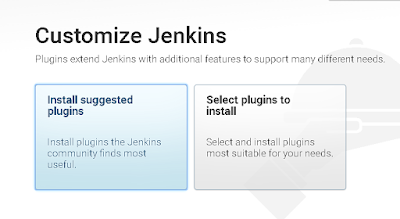
  • Select the suggested plugins to install


  • Now we can use Jenkins  

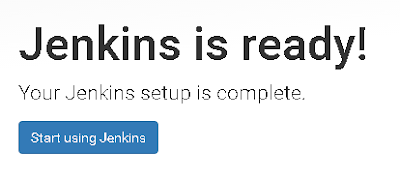
  • Jenkins set up is complete. Click on start using Jenkins for creating jobs.


  • Jenkins dashboard will be displayed

Monday, August 15, 2016

Quick Code - How to right click an element and select menu option with selenium

Using action, we can perform right click(context click) operation on an object in selenium and also select the menu option using Arrows.down key press as shown in the code below:


Right click and select menu option


Quick Code:


public static void contextMenuSelection(WebElement webElem, int iOption)
      {
 //create an instance of actions class
       Actions action = new Actions(driver); 
 //context click (right click) the element
       action.contextClick(webElem);
       for(int i =1;i<=iOption;i++) 
       {
     //Press send keys for arrow down
        action.sendKeys(Keys.ARROW_DOWN);
       }
 //Press Enter send keys and build and perform the action.
       action.sendKeys(Keys.ENTER).build().perform();
      }

Saturday, July 30, 2016

Quick Codes- Validating element existence in Selenium Wedriver


In this article, one of the way to validate existence of multiple objects of same object type based on element text in the application is explained using Selenium Webdriver with java. Please share other better way to verify element existence using Selenium Webdriver.


public boolean IsElementExists(String ObjectType, String strElemText)
{
 boolean boolElemExists = false;
//In case of multiple objects which needs to be validated, Provide multiple objects
// text seperated by  | in strElemText. e.g: strElemText as "mail|inbox"
// Create an array by splitting array based on delimiter "|"
 String[] elemTextArray = strElemText.split("|");
// Loop through array elements
 for ( int j = 0;j<elemTextArray.length;j++)
 {
  List<WebElement> lstElement = null;
  try
// Better approach will be to pass values from enum for Object type
   switch (ObjectType)
   {
   // in case of link object storing all the elements of type link in lstElement
   case "Link":
     lstElement = driver.findElements(By.tagName("a")); 
    break;
    // in case of link object storing all the elements of type link in label
   case "Label":
    lstElement = driver.findElements(By.tagName("label")); 
    break;
   }
   for (int i=0;i<lstElement.size();i++)
   {
    if (lstElement.get(i).getText().contentEquals(strElemText.trim()))
      {
       boolElemExists = true;
       i= lstElement.size()-1;
      }
   }
   if (boolElemExists = false)
   {
    return false;
   }
   }
  catch(Exception e)
  {
   return false;
  }
 }
 return boolElemExists;
}

Tuesday, July 26, 2016

Quick Codes -How to highlight element using Selenium WebDriver

This code snippet shows one of the way to highlight an element using JavaScript executor in Selenium WebDriver. Please share your inputs on other ways to highlight an element using Selenium.


package testingqaautomation; 

import org.junit.Test;
import org.openqa.selenium.By;  
import org.openqa.selenium.JavascriptExecutor;  
import org.openqa.selenium.WebDriver;  
import org.openqa.selenium.WebElement;  
import org.openqa.selenium.firefox.FirefoxDriver;  
 
 public class HighlightWithJE {  
      static WebDriver driver; 
      @Test
      public void Testing() throws InterruptedException {  
  // Connect to the firefox driver server 
  driver = new FirefoxDriver(); 
  //maximise the browser   
  driver.manage().window().maximize();   
  //Navigate to the application, change url to a valid url
  driver.navigate().to("https://www.seleniumbites.blogspot.com");  
  //find element to highlight, select a valid element
  WebElement linkElem = driver.findElement(By.linkText("Gmail"));  
  //create instance of javascript executor
  JavascriptExecutor js = (JavascriptExecutor) driver; 
  //highlight the element to green color and wait
  //for 3 sec and then click the element
  js.executeScript("arguments[0].setAttribute('style','border: solid 8px green')", linkElem);   
  Thread.sleep(3000);  
  js.executeScript("arguments[0].setAttribute('style', arguments[1]);", linkElem, "");  
  linkElem.click();            
      } 
}   

Saturday, July 23, 2016

Installing TestNG in eclipse


TestNG is a testing framework used to design automated functional/unit tests in Java. Eclipse is one of the most popular IDE for developing tests in Java. In this article, we will understand how to set up/install testNG with Eclipse.


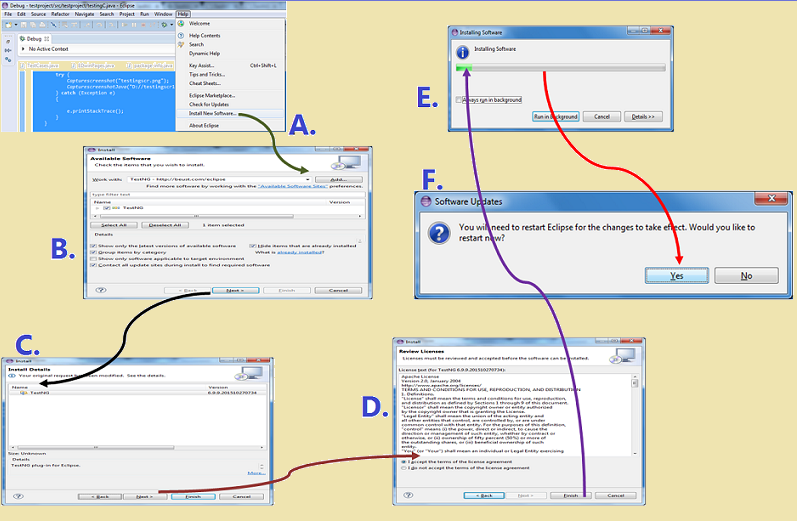
A. Launch Eclipse IDE and Navigate to Help>Install new Software. A pop-up page with title as Install will be displayed.


B. Set http://beust.com/eclipse in Work With Input box and click on Add Button.


C. Checkbox for TestNG is displayed in the Page. Select checkbox and click on Next.


D. Agree to the license agreement.


E. Software download will begin and TestNG will be installed.


F. Once TestNG installation is done, a pop-up window will be displayed asking to restart eclipse for changes to take place. Click on Yes to complete TestNG installation


Installing testNG in eclipse


Another way to install TestNG in eclipse is to navigate to Help>Eclipse Marketplace and search for TestNG. Install TestNG from the search results.


Installing testNG in eclipse marketplace

Saturday, July 16, 2016

Data Driven Approach - Using HashMap/Dictionary for Selenium automation

In this article, we will discuss how to create data dictionary or hash map in Java for data driven tests and read the data from the excel/csv file similar to dictionary object. Please go through below code example to read data from the external source using hashmap/dictionary or data driven approach. Please suggest or comment for better approach for data driven testing in java for Selenium.


package testingtest;

import java.io.File;
import java.io.IOException;
import java.util.HashMap;
import jxl.Cell;
import jxl.Sheet;
import jxl.Workbook;
import jxl.read.biff.BiffException;

class testclass {

 static String[][] getexceldatainArray;
 static HashMap<String, String> dictionary;

 public static void main(String[] args) throws IOException, BiffException {
  // Create an array based on data in excel file
  excelarrayclass tc = new excelarrayclass();
  getexceldatainArray = tc.CreateArrayfromExcel("D:\\Testing.xls",
    "testing");
  for (int i = 0; i < getexceldatainArray.length; i++) {
   dictionary = DataDictionaryFromArray(getexceldatainArray, i);
   // the keys will be value in the header column
   String username = dictionary.get("UserName");
   /*
    * Perform the required operation using the dictionary values
    */
   System.out.println("UserName " + username);
  }
 }

 public String[][] CreateArrayfromExcel(String WorkbookName, String SheetName)
   throws BiffException, IOException {
  String[][] arrTestDta;

  Workbook workbk = Workbook.getWorkbook(new File(WorkbookName));
  Sheet wrkSheet = workbk.getSheet(SheetName);
  arrTestDta = new String[wrkSheet.getRows()][wrkSheet.getColumns()];

  // Loop to get data from excel file into an array

  for (int i = 0; i < wrkSheet.getRows(); i++) {
   for (int j = 0; j < wrkSheet.getColumns(); j++) {
    Cell cell = wrkSheet.getCell(j, i);
    if (cell.getContents() != null) {
     arrTestDta[i][j] = cell.getContents();
    }
   }
  }
  return arrTestDta;
 }

 public static HashMap<String, String> DataDictionaryFromArray(
  String[][] arrayforDictionary, int iRow) {
  // Create a hashmap to store the data as dictionary in key value form
  HashMap<String, String> dictionary = new HashMap<String, String>();
  // get the size of the array, assuming being used in data driven test,
  // get the number of columns in the data file
  int iColCnt = arrayforDictionary[0].length;
  for (int i = 0; i < iColCnt; i++) {
   // mark the header column values as key and current column value as
   // key value pair
   dictionary.put(arrayforDictionary[0][i],
     arrayforDictionary[iRow][i]);
  }
  return dictionary;
 }
}

Sunday, July 10, 2016

Code to read data from excel file - Java Selenium Data Driven frameworks

In Data driven framework for automation testing, data is stored in external file and helper/utility classes are created to interact with the data stored in external file. Data is normally stored in excel or csv files. Storing data in excel file is convenient as data for multiple workflows/module can be stored in different sheets of the same workbook. In the last post,code explaining how to read data from a csv file was explained. Click here to understand how to read data from a csv file.


In this post, we will understand how to interact with excel file. To interact with excel file, we need to add external jar files. Two common external file to interact with excel are :

  • jxl.jar - Supports only xls format.
  • org.apache.poi - Support both xls and xlsx format.

Download the external Jar file and add in the build path for the project. Below code shows how to read data from excel file using jxl.jar 


package testingtest;

import java.io.File;
import java.io.IOException;
import jxl.Cell;
import jxl.Sheet;
import jxl.Workbook;
import jxl.read.biff.BiffException;

class excelarrayclass {

 static String[][] getexceldatainArray;

 public static void main(String[] args) throws IOException, BiffException {
  // Create an array based on data in excel file
  excelarrayclass tc = new excelarrayclass();
  getexceldatainArray = tc.CreateArrayfromExcel("D:\\Testing.xls",
    "testing");
 }

 public String[][] CreateArrayfromExcel(String WorkbookName, String SheetName)
   throws BiffException, IOException {
  String[][] arrTestDta;

  Workbook workbk = Workbook.getWorkbook(new File(WorkbookName));
  Sheet wrkSheet = workbk.getSheet(SheetName);
  arrTestDta = new String[wrkSheet.getRows()][wrkSheet.getColumn()]

  for (int i = 0; i < wrkSheet.getRows(); i++) {
   for (int j = 0; j < wrkSheet.getColumns(); j++) {
    Cell cell = wrkSheet.getCell(j, i);
    if (cell.getContents() != null) {
     arrTestDta[i][j] = cell.getContents();
     System.out.println(cell.getContents());
    }
   }
  }
  return arrTestDta;
 }

}

Saturday, July 9, 2016

Creating array from data in CSV file for Data driven tests in selenium

Two dimensional Array can be created from csv file using the below code to automate workflows in selenium Web-driver using data driven approach. Once data is stored in an array, the code need not to interact with external file again and again but will interact with the array or with data dictionary/hashmap created from the array. 

Code to create an array from CSV file:


package testingtest;

import java.io.BufferedReader;
import java.io.File;
import java.io.FileInputStream;
import java.io.IOException;
import java.io.InputStream;
import java.io.InputStreamReader;

class testclass {

 static String[][] getcsvdatainArray;
    
 public static void main(String[] args) throws IOException {
  // Create an array based on data in a csv file
  testclass tc = new testclass();
  getcsvdatainArray = tc.createarrfromcsvfile("D:/testing.csv");
 }
 
 //get count of rows of data in the csv file
 private int getrowsfromcsv(String strFileName) throws IOException
 {
  InputStream inputfile = new FileInputStream(new File(strFileName));
     BufferedReader bfrReader = new BufferedReader(new InputStreamReader(inputfile));
     int rowscount = 0;
     while ( bfrReader.readLine() != null)
     {
      rowscount++;
     }
     System.out.println(rowscount); 
     bfrReader.close();  
     return rowscount;
 }
 
 //get count of column of data in the csv file
 private int getcolumnsfromcsv(String strFileName) throws IOException
 {
  InputStream inputfile = new FileInputStream(new File(strFileName));
     BufferedReader bfrReader = new BufferedReader(new InputStreamReader(inputfile));
     int columncnt = bfrReader.readLine().split(",").length ;
     bfrReader.close();
     return columncnt;
 }
 
 //create a 2 dimensional string array from the content of csv file
 public String[][] createarrfromcsvfile(String strFileName) throws IOException
 {
  //get rows and column count in the csv file
  int introwcount = getrowsfromcsv(strFileName);
  int intcolcount = getcolumnsfromcsv(strFileName);
  InputStream inputfile = new FileInputStream(new File(strFileName));
     BufferedReader bfrreader = new BufferedReader(new InputStreamReader(inputfile));
     String strrowdta,strrowinfo[];
     int rowcnt = 0;
     //create an array
     String[][]strDta = new String[introwcount][intcolcount];
     //store data in the array
     while ((strrowdta = bfrreader.readLine()) != null)
     {     
      strrowinfo = strrowdta.split(",") ;   
      for (int i = 0;i<strrowinfo.length;i++)
      {
       strDta[rowcnt][i] = strrowinfo[i];
       System.out.println(strDta[rowcnt][i]);
      }
      rowcnt++;     
     }
     bfrreader.close(); 
     return strDta;
 }
}


In another post,code explaining how to read data from a excel file was explained. Click here to understand how to read data from a excel file.

Saturday, March 12, 2016

Page Object Model pattern in Selenium?

Page Object Model in selenium is a design Pattern (Design Pattern is a general reusable solution(best practices) to a commonly occurring problem within the context in software design) implemented using selenium Web Driver. Page Object Model is used to create object repository for elements in the web application used in test flows.


Page Object Model Pattern serves following purposes:


  • Segregating objects definition from test scripts in separate classes making test scripts independent of page elements and locators, thus reducing the maintenance cost in case of changes in elements locator in the Application under test.
  • Defining Page elements and page methods in Page classes help in re-usability of the page elements and methods in different tests reduces the line of code and makes it more maintainable as changes in application needs to be implemented at Page classes only.
  • Make code more readable in the test scripts.
  • Easier for testers with less knowledge of selenium/Java to create test scripts once the Page classes are prepared.

Page Object Model - Do not see too seriously

Understanding how to automate a web application using selenium Web Driver using Page Object Model design pattern


Let us try to understand how Page object model pattern is implemented with an example. 


Suppose there are number of pages in an Web Application and within each page there are multiple elements in each page. Let us assume linear approach for creating automated test cases. Suppose there are ~100 test scripts(workflows) to test the application. Each of the workflow starts with login into application. In each of the test cases, we would have defined the locators for input fields for username and password and login button elements and interact(perform action) with the element. 


Creating test using above approach will result in following problems:
  • In case of changes in an element locator, changes needs to be implemented at multiple tests
  • Readability of test will be poor due to locators defined at test level. 
  • Lines of code will be higher and approach for creating test scripts will vary from one test developer to another.
  • Requires script developer to have good selenium knowledge for test scripts creation. 

Object repository structure in QTPA better approach would be to define elements locators at a different location from test scripts. Also methods for working with elements should be defined, separate of the test scripts.


If you had worked with QTP before, the object repository used to be maintained in tree structure. In Page Object model design pattern,Web Pages are represented by classes with elements in the Page defined as members of the class. Actions on the elements are implemented as methods in the class very much similar to QTP approach.


Implementing Page Object Model:


  • Create a class for login Page (similarly create class for different pages).
  • Define the objects locator in the Page as member of the class.
  • In the constructor method for the Page class, load or intialise the elements defined in the Page using Page Object Factory. 
  • Create user defined methods in the class to input data in the input box, clicking the login button, and methods for successful login or failure. 
  • An object of the page class will be created in the test scripts to interact with the objects and methods for Page class.
    Page Object model pattern implementation

I have not added any code snippet in this article, but below reference article have nice examples explaining the code and concept of Page Object model pattern in selenium.


Useful References for code and concept of Page Object Model

Hope you find this post informative or atleast the references useful.