Showing posts with label Selenium 2. Show all posts

Tuesday, March 14, 2017

How to select values in dropdown using select in Selenium


  •  How to define an element of type dropdown or tag as select: We can define a element of type dropdown using the statement as shown below:             


Select selectElement = new Select(driver.findElement(By.id("SelectApp")));

  • Example of Select tag in html page: Below example shows how the values are defined in a select dropdown.


<select id="SelectApp">
<option value="Facebook">FB</option>
<option value="TasteBook">TB</option>
<option value="ClassBook">CB</option>
<option value="HomeBook">HB</option>
<option value="TestBook">TTB</option>
</select>


  • SelectByValue would select the option from the dropdown for option: <option value="Facebook">FB</option> if provided. selectByValue: Selects value based on argument value for the tag.

 selectElement.selectByValue("Facebook");  

  • selectByVisibleText: Select value based on the text of the tag


selectElement.selectByVisibleText("FB");        

  • selectByIndex: select the fifth dropdown using selectByIndex


 selectByIndex.selectByIndex(4);              

Monday, November 7, 2016

Selenium IDE Panes and Shortcut keys


Selenium IDE Layout is divided into following areas: 


 MenuBar – Below are the top level menu options available in Selenium IDE.
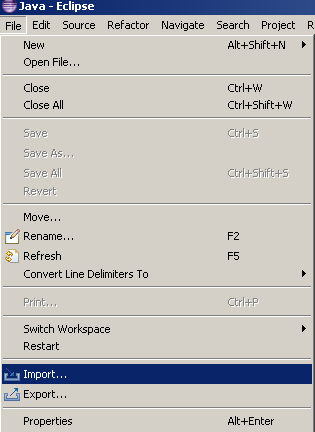
  • File – Allows creating new test case, test suite, open existing test case, test suite, exporting tests to other formats.
    • From the File Menu, We can perform various tasks:
      • Create New Test Case.
      • Create new Test Suite.
      • Save test cases and test suites.
      • Export Test cases/test suites to various formats. E.g : Ruby/Python/java/c# with WebDriver or RC.
      • Open existing test cases and test suites.
      • Rename a test case
  • Edit – Allows editing existing test steps, and adding new commands and comments
  • Actions – Allows to record, play a test, execute command, toggle breakpoint and set entry point.
  • Options – Allows changing of settings including set the timeout value for commands,specifying the format used for saving test cases and creating log file for selenium execution
  • Help – provides documentation for selenium IDE.
Selenium IDE Layout
Understanding Panes in Selenium IDE

  •      Toolbar – Provides buttons to manage test execution including test execution and test execution.
  •      Test Case Pane – Test Case Pane shows the list of test case on the left and test steps in table or    source pane on the right. We can add/modify commands, target and value in the table for the test.
  •      Log/Reference/UI-Element/Rollup Pane – This pane helps us to view logs of execution, reference explaining the selected command. We can also set to filter logs for info, warning, error and debug in this window.

ShortCut Keys: Selenium IDE


New Test - Ctrl + N
Open a test - Ctrl + O
Save a test - Ctrl + S
Add test to test suite - Ctrl + D.
Close Selenium IDE - Ctrl + W
Undo - Ctrl + Z
Redo - Ctrl + Y
Cut - Ctrl + X
Copy - Ctrl + C
Paste - Ctrl + V
Delete - Del
Select All - Ctrl + A

Saturday, September 24, 2016

Importing an existing maven Project in eclipse in three steps.

An existing Maven Project can be imported in eclipse following simple steps as shown below.


1. In the eclipse workspace, click on File>Import.


 2. Select Maven>Existing Maven Projects

3. Browse to the folder location when Maven Project to be imported exist. Once the location is provided. It will search for the POM file. Select the file and click on Finish. Maven Project will be imported successfully.It will take a while to download dependencies and available to use.

Extracting Tooltip text using Selenium WebDriver : Quick Codes

Tooltip displayed for an element is identifed based on the attribute title defined for the element. Knowing that title of the element is the tooltip resolves half of the problem.


Suppose there is an element with id as abcde, the tooltip of the element can be stored in a string using code as below: 

Tooltip example


//example 1: getting tooltip of the elemet 
String strToolTipText = driver.findElement(By.xpath("//input[@id='abcde']").getAttribute("title");

//example 2 : Validating tooltip is displayed correctly for an webElement 
public boolean verifyTooltipText(WebElement webElem, String expToolTiptext)
 {
  String acttooltiptext = webElem.getAttribute("title");
  if(acttooltiptext.contentEquals(exptooltiptext))
  {
  return true
  }
  else
  {
  return false
 }
}