package test;

import org.openqa.selenium.WebDriver;
import org.openqa.selenium.firefox.FirefoxDriver;
import org.openqa.selenium.remote.DesiredCapabilities;

public class testing {

    public static void main(String[] args) throws InterruptedException {
 // Download the geckodriver based on the firefox if it is 32 bit or 64
 // bit installed in the machine
 // Save the driver and provide path of the exe for geckodriver
 System.setProperty("webdriver.gecko.driver", "E:\\Selenium\\geckodriver-v0.18.0-win64\\geckodriver.exe");
 // define the capabilities of firefox browser with marionette set as true
 DesiredCapabilities capabilities = DesiredCapabilities.firefox();
 capabilities.setCapability("marionette", true);
 // create an instance of firefox driver
 WebDriver driver = new FirefoxDriver(capabilities);
 driver.get("http://www.rediff.com");
 driver.quit();
    }
}
Showing posts with label selenium codes. Show all posts
Showing posts with label selenium codes. Show all posts
Sunday, July 23, 2017
Code to open firefox with selenium 3.4 using GeckoDriver 1.8
Saturday, July 22, 2017
Switch between Windows using switch to in Selenium
String MainWinHandle = driver.getWindowHandle();
for(String NewWinHandle : driver.getWindowHandles()){
// Ignore the parent window open and work with the new window frame
 if(!NewWinHandle.equals(MainWindowHandle))
  {
    driver.switchTo().window(NewWinHandle);
 //Perform the required tasks to be performed in the new window opened
 driver.close();
 }
}
//Perform action on the main window once the task is completed with the old window.
driver.switchTo().window(MainWinHandle);
Monday, May 15, 2017
Jenkins - Adding a conditional build step.
In Jenkins, at times we may require Jenkins to execute some build step on one condition and another in case of other condition. For e.g: It may be required to run a particular test/batch command on Weekdays and some other batch condition on weekends. We can create a job to perform different tasks based on the condition satisfied.
To add a conditional build step, follow below steps in Jenkins.


To add a conditional build step, follow below steps in Jenkins.
- Navigate to Jenkins>Manage Jenkins>Manage Plugins and go to available tab.
- Search for Conditional buildstep as shown below and click on install without restart.

- It will install the plugin and will show success once installation completes.

- Now the plugin can be used in the Jenkins job as shown below.In the job, add build step as Conditional step (single)

- Provide the conditional step from the list as shown below and execute the build command.

Saturday, May 13, 2017
WaitFor Commands for AJAX application in selenium ide
AJAX stands for Asynchronous JavaScript And XML. AJAX uses combination of browser built-in XMLHttpRequest to request data from a web server and JavaScript/HTML DOM to display/use the data. Due to asynchronous nature of request and response of the calls, there may be delay in element being displayed in the page after an action has been performed on another element in the page.
 To wait for the element to appear in the page, there are different waitfor commands in selenium IDE, which waits for default timeout set up for the element to appear. So in case an element is not displayed straightway, waitfor commands can be used to resolve sync issues in selenium IDE.
 Some commonly used waitfor commands are:
- waitForAlertNotPresent/waitForAlertPresent
- waitForElementPresent
- waitForTextPresent
- waitForPageToLoad
- waitForFrameToLoad
- clickandWait
Friday, April 21, 2017
How to get text of an alert message in Selenium Webdriver: Mini-blogs
An alert message appears at times to notify the users of the alert as shown below. Using selenium webdriver, we can capture the text in the alert message using selenium web driver.

Using below two lines of code, we can get the alert message.
Alert alert = driver.switchTo().alert();
alert.getText();
Saturday, April 8, 2017
How to identify and close window alert using selenium
At times in browser,Alert box with a specified message and an OK button is displayed to ensure information comes through to the user.
Alert box prevents the user from accessing other parts of the page until the box is closed. An alert is displayed is as shown below:
While automating the web application, we can handle the pop up using alert Interface
The alert() method displays an alert box with a specified message and an OK button.
Below code shows how to close an window alert pop up using selenium:
 |
The alert() method displays an alert box with a specified message and an OK button.
Below code shows how to close an window alert pop up using selenium:
public void Accept_Alert_Message() {
    try {
  //Using webdriver wait, we will wait for the alert
  //to appear before performing action on the alert
        WebDriverWait driverwait = new WebDriverWait(driver, 5);
        driverwait.until(ExpectedConditions.alertIsPresent());
  //switch to the alert element
        Alert alert = driver.switchTo().alert();
  //accept the alert displayed
        alert.accept();
  //switch to the default content
  driver.switchTo().defaultContent();
    } catch (Exception e) {
     // in case alert is not displayed, the code will go to catch loop
    }
}
Tuesday, March 14, 2017
How to select values in dropdown using select in Selenium
- How to define an element of type dropdown or tag as select: We can define a element of type dropdown using the statement as shown below:
Select selectElement = new Select(driver.findElement(By.id("SelectApp")));
- Example of Select tag in html page: Below example shows how the values are defined in a select dropdown.
<select id="SelectApp">
<option value="Facebook">FB</option>
<option value="TasteBook">TB</option>
<option value="ClassBook">CB</option>
<option value="HomeBook">HB</option>
<option value="TestBook">TTB</option>
</select>
- SelectByValue would select the option from the dropdown for option: <option value="Facebook">FB</option> if provided. selectByValue: Selects value based on argument value for the tag.
selectElement.selectByValue("Facebook");
- selectByVisibleText: Select value based on the text of the tag
selectElement.selectByVisibleText("FB");
- selectByIndex: select the fifth dropdown using selectByIndex
selectByIndex.selectByIndex(4);
Tuesday, December 6, 2016
Tutorials to understand TestNG for Selenium Webdriver
Installing TestNG in eclipse - This post explains how to install TestNG in eclipse.
MindMap for TestNG - Understanding the concept in TestNG using MindMap.
Annotations in TestNG - Different annotations used in TestNG
Assertion and Soft Assertions in Selenium Webdriver using TestNG - What are different assertions and soft assertions in selenium webdriver. What is the difference between assertions and soft assertion. How to use assertion in the test.
Maven POM.xml: Dependencies for Selenium, TestNG and junit - How to add TestNG dependenies in maven project.
Using dependencies and priority in TestNG tests: Ordering tests execution - how to define dependencies between tests and priotising order of tests execution in TestNG.
Creating TestNG.xml to run Selenium test suites - How to create testNG xml file for executing testsuite in TestNG. This article explains, how to create xml file for execution in different scenarios.
How to run multiple test suites in TestNG? - Suppose we have individual suite for different module. This article explains how to create testNG xml file to run multiple test suites.
Maven POM.xml: Dependencies for Selenium, TestNG and junit - How to add dependencies for TestNG in Maven POM.xml
Sunday, November 27, 2016
How to run test with random data in Selenium IDE: store and storeText Command
Selenium IDE is a tool for record and play functionality, which runs the script with same set of data, however we can generate random data. store the values in a variable , and use the value stored in the variable in the later steps in the test.
Expected Learning from this article:
- Store command to store random generated data in the a variable.
- Using the stored information in later steps in the test.
- Using command storeText to store value of an object in the test and storing in a test.
- Using the stored information in later stage in the test.
Below screenshot shows how to use store and storetext in the test:

- In the above test, we open an application and save the text of the link in variable using command storeText. test in Value is the variable in each we can store the value of the link/object.
- In the next step, we can use the value in the variable using ${variable_name} which is ${test} in our example.
- Similarly using store command and javascript, we can generate random data, store in the variable and use further in the test.
- We have saved the test in an html file and the test file looks as below:
<?xml version="1.0" encoding="UTF-8"?> <!DOCTYPE html PUBLIC "-//W3C//DTD XHTML 1.0 Strict//EN" "http://www.w3.org/TR/xhtml1/DTD/xhtml1-strict.dtd"> <html xmlns="http://www.w3.org/1999/xhtml" xml:lang="en" lang="en"> <head profile="http://selenium-ide.openqa.org/profiles/test-case"> <meta http-equiv="Content-Type" content="text/html; charset=UTF-8" /> <link rel="selenium.base" href="https://www.google.co.in/" /> <title>testing stored value</title> </head> <body> <table cellpadding="1" cellspacing="1" border="1"> <thead> <tr><td rowspan="1" colspan="3">testing stored value</td></tr> </thead><tbody> <tr> <td>open</td> <td>/search?q=selenium&ie=utf-8&oe=utf-8&client=firefox-b-ab&gfe_rd=cr&ei=r4E6WIqnEeXI8AfOn6awBw</td> <td></td> </tr> <tr> <td>storeText</td> <td>link=Selenium - Web Browser Automation</td> <td>test</td> </tr> <tr> <td>type</td> <td>id=lst-ib</td> <td>${test}</td> </tr> <tr> <td>click</td> <td>name=btnG</td> <td></td> </tr> <tr> <td>store</td> <td>javascript{"Selenium" +Math.random();}</td> <td>testrandom</td> </tr> <tr> <td>type</td> <td>id=lst-ib</td> <td>${testrandom}</td> </tr> <tr> <td>click</td> <td>name=btnG</td> <td></td> </tr> </tbody></table> </body> </html>
Copy paste the code in a text file and save in html format. Open the test in Selenium Ide and try to run the test and understand how to run test with random data in selenium IDE.
Friday, November 18, 2016
scrollIntoView JavaScriptExecutor - How to Scroll until element is visible
We can scroll to an element using Action class or JavaScript executor, Below code can be useful in case you encounter such a scenario in selenium Webdriver:
A. Using JavaSript Executor - scrollIntoView
Provide parameter value as true or false for scrollIntoView
true - Provide value as true if the element is below in the page from the current scroll position
false - Provide value as true if the element is below in the page from the current scroll position
WebElement webElement = driver.findElement(By.xpath("element xpath"));
((JavascriptExecutor) driver).executeScript("arguments[0].scrollIntoView(true);", webElement);
Thread.sleep(500);
B. Using Actions - MovetoElement method
WebElement webElement = driver.findElement(By.xpath("element xpath"));
Actions actions = new Actions(driver);
actions.moveToElement(webElement);
actions.perform();
Friday, November 11, 2016
Exporting selenium IDE tests to WebDriver
Script created in Selenium IDE can be exported to WebDriver/Remote Control in the languages java/c#/python/ruby that can be run using junit(java), RSpec(ruby), nUnit and testNG.
To export test in TestNG with selenium webdriver, follow below steps:
- Record the required operations on the application.
- Go to File>Export Test Case as Java / TestNG / WebDriver (can export test script in different formats)

- Export the test.
- A java file will be created with content as shown below
package com.example.tests;

import java.util.regex.Pattern;
import java.util.concurrent.TimeUnit;
import org.testng.annotations.*;
import static org.testng.Assert.*;
import org.openqa.selenium.*;
import org.openqa.selenium.firefox.FirefoxDriver;
import org.openqa.selenium.support.ui.Select;

public class TESTINGAA {
  private WebDriver driver;
  private String baseUrl;
  private boolean acceptNextAlert = true;
  private StringBuffer verificationErrors = new StringBuffer();

  @BeforeClass(alwaysRun = true)
  public void setUp() throws Exception {
    driver = new FirefoxDriver();
    baseUrl = "https://www.google.co.in/";
    driver.manage().timeouts().implicitlyWait(30, TimeUnit.SECONDS);
  }

  @Test
  public void testINGAA() throws Exception {
    driver.get(baseUrl + "/?gfe_rd=cr&ei=_OMdWJKzEO3I8AeAqrBg&gws_rd=ssl");
    driver.findElement(By.id("lst-ib")).clear();
    driver.findElement(By.id("lst-ib")).sendKeys("TESTING AUTOMATION CONEPTS");
    assertTrue(isElementPresent(By.linkText("TESTING AUTOMATION CONCEPTS")));
    driver.findElement(By.linkText("TESTING AUTOMATION CONCEPTS")).click();
    driver.findElement(By.linkText("Test automation - Wikipedia")).click();
    assertTrue(isElementPresent(By.linkText("Test automation - Wikipedia")));
  }

  @AfterClass(alwaysRun = true)
  public void tearDown() throws Exception {
    driver.quit();
    String verificationErrorString = verificationErrors.toString();
    if (!"".equals(verificationErrorString)) {
      fail(verificationErrorString);
    }
  }

  private boolean isElementPresent(By by) {
    try {
      driver.findElement(by);
      return true;
    } catch (NoSuchElementException e) {
      return false;
    }
  }

  private boolean isAlertPresent() {
    try {
      driver.switchTo().alert();
      return true;
    } catch (NoAlertPresentException e) {
      return false;
    }
  }

  private String closeAlertAndGetItsText() {
    try {
      Alert alert = driver.switchTo().alert();
      String alertText = alert.getText();
      if (acceptNextAlert) {
        alert.accept();
      } else {
        alert.dismiss();
      }
      return alertText;
    } finally {
      acceptNextAlert = true;
    }
  }
}
Tuesday, November 1, 2016
Creating TestNG.xml to run Selenium test suites.
TestNG is a testing framework used to design automated test suites for functional/unit tests in Java. Below are few reasons which makes TestNG, a strong framework for automation.
- TestNG provides annotations to distinguish tests from methods to be called before the test and after the tests.
- TestNG provides assertions to validate test conditions.
- TestNG provides data Provider annotation to create data driven automated tests.
- TestNG test information is added in an xml file. We can easily create a suite of testNG tests in a master suite xml file and run the tests from eclipse or from Jenkins using ant files.
- XML file denotes a test or suite of tests to be executed.
Pre-condition: Below article are useful to setup and create first TestNG test in selenium.
Focus of this article:
- Creating TestNG xml file to run test suite.
- How to run TestNG xml file in
eclipse.
Let us take an example, suppose there are two classes in a Java Project. we can create a test suite using testng xml file and run the test suite from eclipse as shown in the below image.

Creating TestNG.xml file for different scenarios:
A. Run all the tests in both classes NewTest and NewTest1. This will execute all the methods with beforetest annotation in both the classes, followed by methods with test annotation, and then methods with afterTest annotation.
 <?xml version="1.0" encoding="UTF-8"?>
 <!DOCTYPE suite SYSTEM "http://testng.org/testng-1.0.dtd">
 <suite name="Suite1">
  <test name="Test">
   <classes>
    <class name="testNG.NewTest"/>
       <class name="testNG.NewTest1"/>
   </classes>
  </test>
 </suite>
B. Run test in class NewTest and then the methods in NewTest1 class:
 <?xml version="1.0" encoding="UTF-8"?>
 <!DOCTYPE suite SYSTEM "http://testng.org/testng-1.0.dtd">
 <suite name="Suite1">
  <test name="Test1">
   <classes>
    <class name="testNG.NewTest"/>
         </classes>
  </test>
  <test name="Test2">
   <classes>
    <class name="testNG.NewTest1"/>
   </classes>
  </test>
 </suite>
C. Executing all tests in a package with name as
TestNG(Note: TestNG is the name of package in our example, it can be any name
other than TestNG also)
 <?xml version="1.0" encoding="UTF-8"?>
 <!DOCTYPE suite SYSTEM "http://testng.org/testng-1.0.dtd">
 <suite name="Suite1">
 <test name="Test1">
   <packages>
    <package name="testNG" />
   </packages>
  </test>
 </suite>
D. Executing all tests based on the group Name including and excluding specific tests
 <?xml version="1.0" encoding="UTF-8"?>
 <!DOCTYPE suite SYSTEM "http://testng.org/testng-1.0.dtd">
 <suite name="Suite1">
 <test name="Test1">
  <groups>
   <run>
    <include name="testemail"/>
    <exclude name="testnoemail"/>
   </run>
  </groups>
   <classes>
    <class name="testNG.NewTest"/>
    <class name="testNG.NewTest1"/>
   </classes>
 </test>
 </suite>
E. Executing specific methods by including methods in the class:
 <?xml version="1.0" encoding="UTF-8"?>
 <!DOCTYPE suite SYSTEM "http://testng.org/testng-1.0.dtd">
 <suite name="Suite1">
 <test name="Test1">
 <classes>
   <class name="testNG.NewTest">
    <methods>
     <include name="emailval" />
    </methods>
   </class>
   <class name="testNG.NewTest1"/>
 </classes>
 </test>
 </suite>
Sunday, September 25, 2016
Switching to frame, Windows, alert in Selenium WebDriver
1. How to Switch from one frame to another
 // How to Switch from one frame to another
 WebElement iFrmeElement = driver.findElement(By.xpath("xPath for Frame"));
 driver.switchTo().frame(frameElement);
 //Or
 driver.switchTo().frame(id or name)
 //Or
 driver.switchTo().frame(index of frame)
2. We can switch to default again by:
driver.switchTo().defaultContent();
3. We can switch to a window based on name, Id or Windows handle
driver.switchTo().window("windowName");
4. We can switch to an alert
 Alert alert = driver.switchTo().alert();
 // We can close an alert using methods for alert object
 alert. accept();
Saturday, September 24, 2016
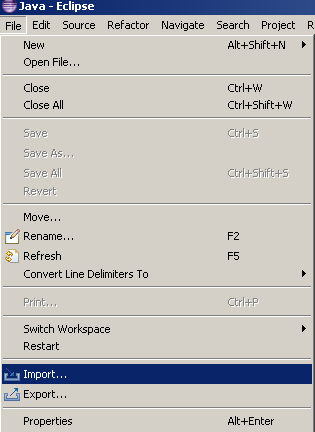
Importing an existing maven Project in eclipse in three steps.
An existing Maven Project can be imported in eclipse following simple steps as shown below.
1. In the eclipse workspace, click on File>Import.
2. Select Maven>Existing Maven Projects

3. Browse to the folder location when Maven Project to be imported exist. Once the location is provided. It will search for the POM file. Select the file and click on Finish. Maven Project will be imported successfully.It will take a while to download dependencies and available to use.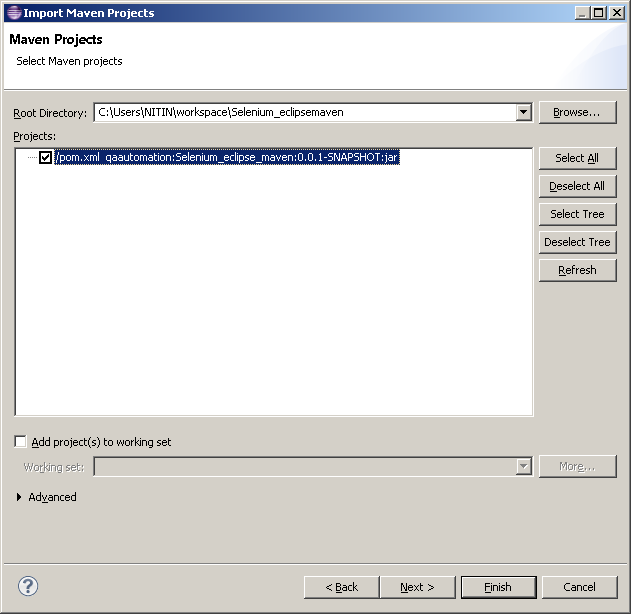
Extracting Tooltip text using Selenium WebDriver : Quick Codes
Tooltip displayed for an element is identifed based on the attribute title defined for the element. Knowing that title of the element is the tooltip resolves half of the problem.
Suppose there is an element with id as abcde, the tooltip of the element can be stored in a string using code as below:

//example 1: getting tooltip of the elemet
String strToolTipText = driver.findElement(By.xpath("//input[@id='abcde']").getAttribute("title");

//example 2 : Validating tooltip is displayed correctly for an webElement
public boolean verifyTooltipText(WebElement webElem, String expToolTiptext)
 {
  String acttooltiptext = webElem.getAttribute("title");
  if(acttooltiptext.contentEquals(exptooltiptext))
  {
  return true
  }
  else
  {
  return false
 }
}
Monday, August 22, 2016
Tips for xpath identifcation for selenium
- Importance of XPath in Selenium?
Selenium WebDriver identifies element based
on locators. XPath is one of the most important locator used for identifying an
element or group of elements. XPath uses path expressions to work with
element in the application.
- Tools for identifying element using Xpath?
An element attribute can be identified by
accessing developer toolbar (pressing F12 in browser windows) by in each of the
browser. There are add-ons/extensions
which can be added in the browser. One
of the useful extensions for Firefox browser is downloading firebug followed by
firepath and identifying elements using Xpath.
- Xpath for the element in case the Id of the
element is available
Xpath = “.//*[@id='gb_testing123']”

This will search for any element with id as 'gb_testing123'. In case there are various element in
the page with id dynamically changing on each page load ,e.g: Id changes from gb_testing123 to
gb_testing224. In such cases , we can have expression as :

Xpath = “.//*[contains(@id,'gb_testing')]”

There may be multiple elements of different element type, Suppose there are different element type
and we want to restrict our xpath to a button element, we can modify the xpath in above expression
as:

Xpath = “.//button[contains(@id,'gb_testing')]”
- Xpath for the element in case the class of the
element is available.
Xpath = “//*[@class='gb_testing123']”
Or
Xpath = “.//*[contains(@class,'gb_testing')]”
Or
Xpath = “.//div[contains(@class,'gb_testing')]”
- Xpath for element in case of attribute value is
available
Xpath = “//*[@activated='1']”
Or
Xpath = “.//*[contains(@activated,'1')]”
Or
Xpath = “.//div[contains(@activated,'1')]”
- Starts with Prefix for attribute value
Xpath = “.//*[@id='gb_testing123']”
This will search for any element with id as 'gb_testing123'. In case there are various element in
the page with id dynamically changing on each page load ,e.g: Id changes from gb_testing123 to
gb_testing224. In such cases , we can have expression as :
Xpath = “.//*[contains(@id,'gb_testing')]”
There may be multiple elements of different element type, Suppose there are different element type
and we want to restrict our xpath to a button element, we can modify the xpath in above expression
as:
Xpath = “.//button[contains(@id,'gb_testing')]”
Xpath = “//*[@class='gb_testing123']”
Or
Xpath = “.//*[contains(@class,'gb_testing')]”
Or
Xpath = “.//div[contains(@class,'gb_testing')]”
Xpath = “//*[@activated='1']”
Or
Xpath = “.//*[contains(@activated,'1')]”
Or
Xpath = “.//div[contains(@activated,'1')]”
//div[starts-with(@class,"gb_")]
- Based on text displayed of the element
//*[text()='Software Testing Tutorial']
- Identifying element based on multiple attribute
value
a. Xpath for element using combination of different attribute in AND condition
.//div[contains(@id,'hdtb')][@class='hdtbna notl']
Or
.//div[contains(@id,'hdtb')  and @class='hdtbna notl']


b. Xpath for element using combination of different attribute in OR condition
.//*[contains(@id,'hdtb') or @class='hdtbna notl']
- Identifying xpath using different element types
matching either A or B.
//a[contains(@id,'hdtb')]|//div[@class='hdtbna notl']

This will return element which are either links containing id as hdtb or
div objects with class as 'hdtbna notl'
- Child element of object type
//div[@id='viewport']/div
 This will return the immediate div elements in the div with id as viewport
//div[@id='viewport']//div
 This will return all the  div elements inside the div with id as viewport
//div[@id='viewport']/div[5]
 This will return the fifth div element immediate child inside the div with id as viewport
- Parent element
//div[@class='rc']/..
 This will return the parent element
//div[@class=’rc’]/../a
 Sibling link element to the div with class as rc.
Monday, August 15, 2016
Quick Code - How to right click an element and select menu option with selenium
Using action, we can perform right click(context click) operation on an object in selenium and also select the menu option using Arrows.down key press as shown in the code below:

Quick Code:
public static void contextMenuSelection(WebElement webElem, int iOption)
      {
 //create an instance of actions class
       Actions action = new Actions(driver);
 //context click (right click) the element
       action.contextClick(webElem);
       for(int i =1;i<=iOption;i++)
       {
     //Press send keys for arrow down
        action.sendKeys(Keys.ARROW_DOWN);
       }
 //Press Enter send keys and build and perform the action.
       action.sendKeys(Keys.ENTER).build().perform();
      }
Saturday, July 30, 2016
Quick Codes- Validating element existence in Selenium Wedriver
In this article, one of the way to validate existence of multiple objects of same object type based on element text in the application is explained using Selenium Webdriver with java. Please share other better way to verify element existence using Selenium Webdriver.
public boolean IsElementExists(String ObjectType, String strElemText)
{
 boolean boolElemExists = false;
//In case of multiple objects which needs to be validated, Provide multiple objects
// text seperated by  | in strElemText. e.g: strElemText as "mail|inbox"
// Create an array by splitting array based on delimiter "|"
 String[] elemTextArray = strElemText.split("|");
// Loop through array elements
 for ( int j = 0;j<elemTextArray.length;j++)
 {
  List<WebElement> lstElement = null;
  try
// Better approach will be to pass values from enum for Object type
   switch (ObjectType)
   {
   // in case of link object storing all the elements of type link in lstElement
   case "Link":
     lstElement = driver.findElements(By.tagName("a"));
    break;
    // in case of link object storing all the elements of type link in label
   case "Label":
    lstElement = driver.findElements(By.tagName("label"));
    break;
   }
   for (int i=0;i<lstElement.size();i++)
   {
    if (lstElement.get(i).getText().contentEquals(strElemText.trim()))
      {
       boolElemExists = true;
       i= lstElement.size()-1;
      }
   }
   if (boolElemExists = false)
   {
    return false;
   }
   }
  catch(Exception e)
  {
   return false;
  }
 }
 return boolElemExists;
}
Tuesday, July 26, 2016
Quick Codes -How to highlight element using Selenium WebDriver
This code snippet shows one of the way to highlight an element using JavaScript executor in Selenium WebDriver. Please share your inputs on other ways to highlight an element using Selenium.
package testingqaautomation;

import org.junit.Test;
import org.openqa.selenium.By;
import org.openqa.selenium.JavascriptExecutor;
import org.openqa.selenium.WebDriver;
import org.openqa.selenium.WebElement;
import org.openqa.selenium.firefox.FirefoxDriver;

 public class HighlightWithJE {
      static WebDriver driver;
      @Test
      public void Testing() throws InterruptedException {
  // Connect to the firefox driver server
  driver = new FirefoxDriver();
  //maximise the browser
  driver.manage().window().maximize();
  //Navigate to the application, change url to a valid url
  driver.navigate().to("https://www.seleniumbites.blogspot.com");
  //find element to highlight, select a valid element
  WebElement linkElem = driver.findElement(By.linkText("Gmail"));
  //create instance of javascript executor
  JavascriptExecutor js = (JavascriptExecutor) driver;
  //highlight the element to green color and wait
  //for 3 sec and then click the element
  js.executeScript("arguments[0].setAttribute('style','border: solid 8px green')", linkElem);
  Thread.sleep(3000);
  js.executeScript("arguments[0].setAttribute('style', arguments[1]);", linkElem, "");
  linkElem.click();
      }
}
Saturday, July 16, 2016
Data Driven Approach - Using HashMap/Dictionary for Selenium automation
In this article, we will discuss how to create data dictionary or hash map in Java for data driven tests and read the data from the excel/csv file similar to dictionary object. Please go through below code example to read data from the external source using hashmap/dictionary or data driven approach. Please suggest or comment for better approach for data driven testing in java for Selenium.
package testingtest;

import java.io.File;
import java.io.IOException;
import java.util.HashMap;
import jxl.Cell;
import jxl.Sheet;
import jxl.Workbook;
import jxl.read.biff.BiffException;

class testclass {

 static String[][] getexceldatainArray;
 static HashMap<String, String> dictionary;

 public static void main(String[] args) throws IOException, BiffException {
  // Create an array based on data in excel file
  excelarrayclass tc = new excelarrayclass();
  getexceldatainArray = tc.CreateArrayfromExcel("D:\\Testing.xls",
    "testing");
  for (int i = 0; i < getexceldatainArray.length; i++) {
   dictionary = DataDictionaryFromArray(getexceldatainArray, i);
   // the keys will be value in the header column
   String username = dictionary.get("UserName");
   /*
    * Perform the required operation using the dictionary values
    */
   System.out.println("UserName " + username);
  }
 }

 public String[][] CreateArrayfromExcel(String WorkbookName, String SheetName)
   throws BiffException, IOException {
  String[][] arrTestDta;

  Workbook workbk = Workbook.getWorkbook(new File(WorkbookName));
  Sheet wrkSheet = workbk.getSheet(SheetName);
  arrTestDta = new String[wrkSheet.getRows()][wrkSheet.getColumns()];

  // Loop to get data from excel file into an array

  for (int i = 0; i < wrkSheet.getRows(); i++) {
   for (int j = 0; j < wrkSheet.getColumns(); j++) {
    Cell cell = wrkSheet.getCell(j, i);
    if (cell.getContents() != null) {
     arrTestDta[i][j] = cell.getContents();
    }
   }
  }
  return arrTestDta;
 }

 public static HashMap<String, String> DataDictionaryFromArray(
  String[][] arrayforDictionary, int iRow) {
  // Create a hashmap to store the data as dictionary in key value form
  HashMap<String, String> dictionary = new HashMap<String, String>();
  // get the size of the array, assuming being used in data driven test,
  // get the number of columns in the data file
  int iColCnt = arrayforDictionary[0].length;
  for (int i = 0; i < iColCnt; i++) {
   // mark the header column values as key and current column value as
   // key value pair
   dictionary.put(arrayforDictionary[0][i],
     arrayforDictionary[iRow][i]);
  }
  return dictionary;
 }
}
Subscribe to:
Posts (Atom)