Showing posts with label Selenium concepts. Show all posts

Saturday, September 3, 2016

Jenkins setup on localhost server

 
  • Downloading Jenkins
    • Download Jenkins from Jenkins official site.
    • Jenkins.war will be downloaded.


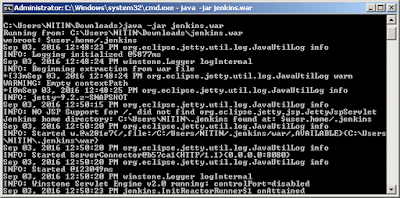
  • Go to command prompt and navigate to folder in which Jenkins is downloaded
  • Run below command in command prompt
  • java -jar jenkins.war


  • Navigate to localhost:8080 on the machine where jenkins is run. The page asks to provide the admin password and the location from where to copy the password.
  • Provide the Password


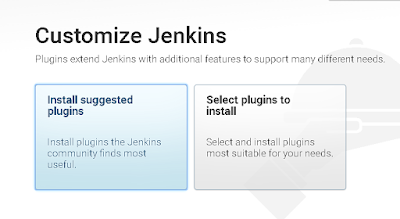
  • Select the suggested plugins to install


  • Now we can use Jenkins  

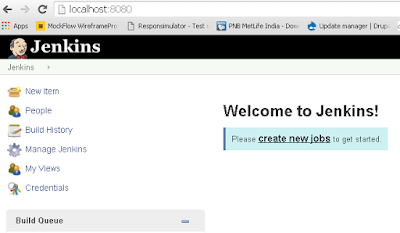
  • Jenkins set up is complete. Click on start using Jenkins for creating jobs.


  • Jenkins dashboard will be displayed

Monday, August 22, 2016

Tips for xpath identifcation for selenium

  • Importance of XPath in Selenium?

Selenium WebDriver identifies element based on locators. XPath is one of the most important locator used for identifying an element or group of elements. XPath uses path expressions to work with element in the application.

  •  Tools for identifying element using Xpath?

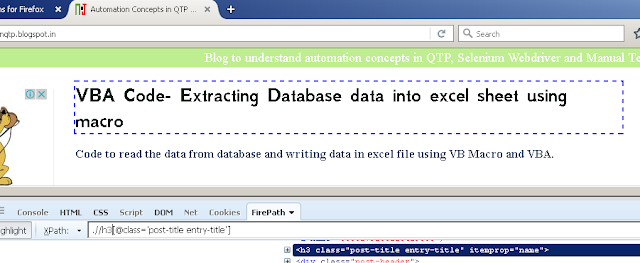
An element attribute can be identified by accessing developer toolbar (pressing F12 in browser windows) by in each of the browser.  There are add-ons/extensions which can be added in the browser.  One of the useful extensions for Firefox browser is downloading firebug followed by firepath and identifying elements using Xpath.


firepath for xpath

  • Xpath for the element in case the Id of the element is available
Xpath = “.//*[@id='gb_testing123']”

This will search for any element with id as 'gb_testing123'. In case there are various element in 
the page with id dynamically changing on each page load ,e.g: Id changes from gb_testing123 to 
gb_testing224. In such cases , we can have expression as :

Xpath = “.//*[contains(@id,'gb_testing')]” 

There may be multiple elements of different element type, Suppose there are different element type
and we want to restrict our xpath to a button element, we can modify the xpath in above expression 
as:

Xpath = “.//button[contains(@id,'gb_testing')]”

  • Xpath for the element in case the class of the element is available. 
Xpath = “//*[@class='gb_testing123']”
Or 
Xpath = “.//*[contains(@class,'gb_testing')]” 
Or 
Xpath = “.//div[contains(@class,'gb_testing')]”

  • Xpath for element in case of attribute value is available 
Xpath = “//*[@activated='1']”
Or
Xpath = “.//*[contains(@activated,'1')]” 
Or  
Xpath = “.//div[contains(@activated,'1')]”

  • Starts with Prefix for attribute value

//div[starts-with(@class,"gb_")]


  • Based on text displayed of the element

//*[text()='Software Testing Tutorial']


  •  Identifying element based on multiple attribute value


a. Xpath for element using combination of different attribute in AND condition
.//div[contains(@id,'hdtb')][@class='hdtbna notl']
Or
.//div[contains(@id,'hdtb')  and @class='hdtbna notl']


b. Xpath for element using combination of different attribute in OR condition
.//*[contains(@id,'hdtb') or @class='hdtbna notl']


  • Identifying xpath using different element types matching either A or B.


//a[contains(@id,'hdtb')]|//div[@class='hdtbna notl']

This will return element which are either links containing id as hdtb or 
div objects with class as 'hdtbna notl'


  • Child element of object type


//div[@id='viewport']/div
 This will return the immediate div elements in the div with id as viewport
//div[@id='viewport']//div
 This will return all the  div elements inside the div with id as viewport
//div[@id='viewport']/div[5]
 This will return the fifth div element immediate child inside the div with id as viewport


  • Parent element


//div[@class='rc']/.. 
 This will return the parent element
//div[@class=’rc’]/../a 
 Sibling link element to the div with class as rc.

Monday, August 15, 2016

Quick Code - How to right click an element and select menu option with selenium

Using action, we can perform right click(context click) operation on an object in selenium and also select the menu option using Arrows.down key press as shown in the code below:


Right click and select menu option


Quick Code:


public static void contextMenuSelection(WebElement webElem, int iOption)
      {
 //create an instance of actions class
       Actions action = new Actions(driver); 
 //context click (right click) the element
       action.contextClick(webElem);
       for(int i =1;i<=iOption;i++) 
       {
     //Press send keys for arrow down
        action.sendKeys(Keys.ARROW_DOWN);
       }
 //Press Enter send keys and build and perform the action.
       action.sendKeys(Keys.ENTER).build().perform();
      }

Saturday, July 30, 2016

Quick Codes- Validating element existence in Selenium Wedriver


In this article, one of the way to validate existence of multiple objects of same object type based on element text in the application is explained using Selenium Webdriver with java. Please share other better way to verify element existence using Selenium Webdriver.


public boolean IsElementExists(String ObjectType, String strElemText)
{
 boolean boolElemExists = false;
//In case of multiple objects which needs to be validated, Provide multiple objects
// text seperated by  | in strElemText. e.g: strElemText as "mail|inbox"
// Create an array by splitting array based on delimiter "|"
 String[] elemTextArray = strElemText.split("|");
// Loop through array elements
 for ( int j = 0;j<elemTextArray.length;j++)
 {
  List<WebElement> lstElement = null;
  try
// Better approach will be to pass values from enum for Object type
   switch (ObjectType)
   {
   // in case of link object storing all the elements of type link in lstElement
   case "Link":
     lstElement = driver.findElements(By.tagName("a")); 
    break;
    // in case of link object storing all the elements of type link in label
   case "Label":
    lstElement = driver.findElements(By.tagName("label")); 
    break;
   }
   for (int i=0;i<lstElement.size();i++)
   {
    if (lstElement.get(i).getText().contentEquals(strElemText.trim()))
      {
       boolElemExists = true;
       i= lstElement.size()-1;
      }
   }
   if (boolElemExists = false)
   {
    return false;
   }
   }
  catch(Exception e)
  {
   return false;
  }
 }
 return boolElemExists;
}

Sunday, July 10, 2016

Code to read data from excel file - Java Selenium Data Driven frameworks

In Data driven framework for automation testing, data is stored in external file and helper/utility classes are created to interact with the data stored in external file. Data is normally stored in excel or csv files. Storing data in excel file is convenient as data for multiple workflows/module can be stored in different sheets of the same workbook. In the last post,code explaining how to read data from a csv file was explained. Click here to understand how to read data from a csv file.


In this post, we will understand how to interact with excel file. To interact with excel file, we need to add external jar files. Two common external file to interact with excel are :

  • jxl.jar - Supports only xls format.
  • org.apache.poi - Support both xls and xlsx format.

Download the external Jar file and add in the build path for the project. Below code shows how to read data from excel file using jxl.jar 


package testingtest;

import java.io.File;
import java.io.IOException;
import jxl.Cell;
import jxl.Sheet;
import jxl.Workbook;
import jxl.read.biff.BiffException;

class excelarrayclass {

 static String[][] getexceldatainArray;

 public static void main(String[] args) throws IOException, BiffException {
  // Create an array based on data in excel file
  excelarrayclass tc = new excelarrayclass();
  getexceldatainArray = tc.CreateArrayfromExcel("D:\\Testing.xls",
    "testing");
 }

 public String[][] CreateArrayfromExcel(String WorkbookName, String SheetName)
   throws BiffException, IOException {
  String[][] arrTestDta;

  Workbook workbk = Workbook.getWorkbook(new File(WorkbookName));
  Sheet wrkSheet = workbk.getSheet(SheetName);
  arrTestDta = new String[wrkSheet.getRows()][wrkSheet.getColumn()]

  for (int i = 0; i < wrkSheet.getRows(); i++) {
   for (int j = 0; j < wrkSheet.getColumns(); j++) {
    Cell cell = wrkSheet.getCell(j, i);
    if (cell.getContents() != null) {
     arrTestDta[i][j] = cell.getContents();
     System.out.println(cell.getContents());
    }
   }
  }
  return arrTestDta;
 }

}

Friday, May 20, 2016

MindMap for Selenium WebDriver

In this mindmap, Basic and initial steps to start with selenium Webdriver are explained in the form of mindmap. Hope you like this mindmap to start with Selenium WebDriver.


MindMap for Selenium WebDriver


Wednesday, May 18, 2016

MindMap for TestNG

In this post, basics of TestNG are described with mindmap. TestNG is an open source automation framework inspired from jUnit but having additional features making it more robust compared to jUnit. It is also used extensively with selenium automation. TestNG.xml is not explained in detail in this post, as it is an important concept and will be covered in a separate post. Hope you like this mind map.


MindMap for TestNG


Sunday, February 21, 2016

Maven POM.xml: Dependencies for Selenium, TestNG and junit

While working with Selenium, TestNG and junit with maven, we need to add in the Project Object Model (POM.xml), dependencies for Selenium, TestNG and junit. In this article, we have explained how to add the required dependency in the dependencies section in pom.xmlfile.

Add the dependency in the dependencies section for the required artifacts. Also please update the version as per latest version of the artifact.


Selenium Dependency:

<dependency>
        <groupId>org.seleniumhq.selenium</groupId>
        <artifactId>selenium-java</artifactId>
        <version>2.52.0</version>
</dependency>

junit Dependency:

<dependency>
  <groupId>junit</groupId>
  <artifactId>junit</artifactId>
  <version>4.12</version>
</dependency>

TestNG Dependency:

<dependency>
  <groupId>org.testng</groupId>
  <artifactId>testng</artifactId>
  <version>6.8</version>
  <scope>test</scope>
</dependency>

Saturday, February 20, 2016

How to use maven to create selenium project

In this article, we will understand the basics of maven and how to create maven project for Selenium WebDriver in eclipse.

Problem Statement of this article:

  • Understanding the use of maven for creating a selenium Project.
  • Installing maven plug-in for eclipse
  • Creating a maven Project in eclipse
  • Adding dependencies for Selenium


Understanding the use of maven for creating a selenium Project.


  • Maven provides a uniform build system.
  • A Project Object Model or POM is an XML file in maven that contains project and configuration information used by Maven to build the project.
  • We can add and configure dependencies for selenium, TestNG and other resources in the maven Project using POM.xml file
  • Maven helps to define Project structure for better management of resources.
  • Maven automatically downloads the necessary files added in dependencies for WebDriver and other resources while building the project.


maven plugin download from eclipse

Installing maven plug-in for eclipse


Below are the steps to install maven plug-in for eclipse

  • Open eclipse and click on Help>Eclipse Marketplace
  • Search for Maven integration for Eclipse in eclipse marketplace. Install Maven integration for Eclipse
  • Restart eclipse.
  • Maven plug-in has been added in eclipse.


Creating a maven Project in eclipse:


  Pre-Condition: Maven Plug-in is added in eclipse.Below are the steps to create a maven project in eclipse.

creating maven project in selenium
  • Navigate to File>New>Project.
  • It will ask to select a wizard. Select Maven>Maven Project and click on Next
creating maven project in selenium
  • To start with, select create a simple project in the window and click on Next.
  • Provide the details for the artifact including Group Id, Artifact Id, Version, packaging to start with.
  • Click on Finish.
creating maven project in selenium

Once we click on finish,maven project is created in Java. As mentioned earlier, All the configurations of the Project are saved in a POM.xml file as shown below:

creating maven project in selenium


POM stands for "Project Object Model". It is XML representation of the Maven project. POM.xml file inherits from base superPOM.xml

How to use selenium libraries in the maven Project.


We can use selenium libraries by adding dependencies for selenium in the Project Object model as shown in the code snippet below:

<project xmlns="http://maven.apache.org/POM/4.0.0" xmlns:xsi="http://www.w3.org/2001/XMLSchema-instance" xsi:schemaLocation="http://maven.apache.org/POM/4.0.0 http://maven.apache.org/xsd/maven-4.0.0.xsd">
  <modelVersion>4.0.0</modelVersion>
  <groupId>qaautomation</groupId>
  <artifactId>Selenium_eclipse_maven</artifactId>
  <version>0.0.1-SNAPSHOT</version>
  <name>My first maven</name>
  <description>testing</description>  
  <dependencies>
      <dependency>
        <groupId>org.seleniumhq.selenium</groupId>
        <artifactId>selenium-java</artifactId>
        <version>2.48.2</version>
    </dependency>
    <dependency>
 <groupId>junit</groupId>
 <artifactId>junit</artifactId>
 <version>4.8.1</version>
</dependency>    
  </dependencies>
</project>

References:


Saturday, February 6, 2016

Assertion and Soft Assertions in Selenium Webdriver using TestNG

We create automated regression test to validate the application is working correctly. We need to add checkpoints/validation at different steps in the workflow to validate the application is correctly behaving or not.

For e.g.: Let us consider login into an e-mail website. We need to go to application URL and assert/validate username and password input box and Login button are displayed correctly. Then next step can be to assert login is successful for a positive test with valid username and password or assert proper error message is displayed for a negative test with invalid username and password.

Testing framework for automation like TestNG and jUnit for Java or nUnit for C# provides feature of assertion to assert/validate the application is working properly and scores 10/10 in the test results.

In this article, we will discuss how to add assertions using TestNG framework for selenium tests.


Problem statements of this article:

  • What is meant by Assertions in TestNG?
  • What are different types of assertion in TestNG?
  • What is the difference between assert and softassertions?
  • Code explaining how to implement assert and softassert in TestNG?


What is meant by Assertions?

With TestNG framework, We can add assertions within tests to validate whether the expected condition is true or false. In most of the assertions, the expected condition is compared with the actual results and test fails in case an assertion fails. The failure is reported in test results.

For example in a selenium test for login functionality, When we provide valid username and password and login into application, we expect the title to be displayed correctly in the page. So in this scenario, we should add an assertion for comparing the expected title of the page with the actual title displayed in the page. In case, the two values does not match, the assertion fails and test execution fails 

What are different types of assertions?

Some of the assertions that can be implemented in TestNG are as follows:
Types of assertion
Description
Assert.AssertEquals(Expected condition, Actual condition)
This compares the expected condition with actual condition and fails the test in case the assertion fails.Different object types can be compared using Assert.AssertEquals
Assert.AssertEquals(Expected condition, Actual condition, Message)
This compares the expected condition with actual condition and fails the test in case the assertion fails displaying the message as defined while calling the assertion.
Assert.assertFalse(Boolean condition)
Asserts that a condition is false
Assert.assertFalse(Boolean condition, String Message )
Asserts that a condition is false. If it isn't, an Assertion Error, with the given message, is thrown.
Assert.assertTrue(Boolean condition, String Message )
Asserts that a condition is true. Assertion fails if condition is not true and string message is displayed.
Assert.AssertNull(object)
Validates if a assertion is null.
Assert.Fail(String strMessage)
Fails an assertion without validating any conditions. This is very useful for outcome of conditional statements. e.g: if title is incorrect, fail the test.


Sample Code to explain how to create assertion in TestNG

package testNG;  
 import java.io.File;  
 import org.openqa.selenium.WebDriver;  
 import org.openqa.selenium.ie.InternetExplorerDriver;  
 import org.testng.Assert;  
 import org.testng.annotations.BeforeTest;  
 import org.testng.annotations.Test;  
 public class assertionVal {  
      WebDriver driver;  
      @BeforeTest  
      public void setup()   
      {  
           File file = new File("D:\\selenium\\IEDriverServer.exe");  
           System.setProperty("webdriver.ie.driver", file.getAbsolutePath());       
           driver = new InternetExplorerDriver();  
      }  
      @Test  
      public void assertVal()   
      {  
           driver.navigate().to("http://qaautomationqtp.blogspot.com");  
           Assert.assertEquals("Learning Automation Concepts in QTP", driver.getTitle());  
           //Assert to compare two values and reporting a message in case validation fails  
           Assert.assertEquals("aaa", "aaa", "this is the first test and value does not match");  
           //Assert to validate a boolean condition as false   
           Assert.assertFalse(driver.getTitle().contentEquals("Learning Automation Concepts in QTP"));  
           //Assert to validate a boolean condition as true   
           Assert.assertFalse(driver.getTitle().contentEquals("Learning Automation Concepts in QTP"));  
        //Assertion to validate an object is not null.  
        Assert.assertNotNull("driver");  
      }  
 }  


What is the difference between assert and soft assertions (Verify statements)?

The issue with assertion is, test execution stops in case an assertion fails. So if we do not want to stop a test on failure and continue with test execution, using assert statement will not work, 
In such sccnarios, we will use soft assertions, using  import org.testng.asserts.SoftAssert; class.
In this case, verification step will fail but test execution will continue. 

Sample Code to explain how to implement soft assertion in TestNG


 package testNG;  
 import org.testng.Assert;  
 import org.testng.annotations.Test;  
 //soft assertion will use the below softAssert class  
 import org.testng.asserts.SoftAssert;  
 public class assertionVal {  
      // Create an soft assertion object softas   
      SoftAssert softas = new SoftAssert();  
      @Test  
      public void assertVal()   
      {  
           //Create an assertion similar to hard assertion as shown below   
           softas.assertEquals("aaaa", "bb");  
           softas.assertEquals("aa","aaccc","asserts exists");  
           // this is an example of hard assertion, test will stop execution   
           //at this step in case error is encountered.  
           Assert.assertEquals("aa", "aa");  
           System.out.println("nitin");  
           //This step is very important as without this step,  
           //no soft assertion failure will be reported in test result.  
           softas.assertAll();  
      }  
 } 

Sunday, January 31, 2016

GetAttributes, Title, Text and more.... in Selenium Webdriver

In this article, we will discuss how to extract data from elements or Page using Selenium Webdriver. Extracting attribute information and text of elements helps to validate elements have correct and expected attribute value or text.

Problem Statement of this article: 
  • How to get title of the page?
  • How to get text of an element?
  • How to get attribute value of element?

How to get title of the Page?


We can get title of the page as well as url of the current Page as shown  below: 
 WebDriver driver = new FirefoxDriver();  
 driver.navigate().to("https://www.google.com");  
 // We can get title of the page using driver.getTitle  
 System.out.println(driver.getTitle());  
 // We can get url of the page using driver.getCurrentUrl  
 System.out.println(driver.getCurrentUrl()); 

How to get text of an element in the Page?


We can get text of an element in the page using gettext() as shown in the code below:
One of the useful and important use of getText can be to get error messages displayed in page, where the class name of all the error message displayed in the page is same. It can be implemented as follows:
  • Identify the classname of the error message.
  • Using findelements, find collection of elements with class name.
  • Loop through the element collection and getText of each element.
 WebDriver driver = new FirefoxDriver();  
 driver.navigate().to("https://www.google.com");  
 WebElement elem = driver.findElement(By.id("gb_P gb_R"));  
 String message = elem.getText();  


How to use getAttribute to validate existence of an object and validating attribute properties?


Below code explains how to use getattribute to validate existence of element and extracting attribute value for the object.
 import java.io.File;  
 import java.util.List;  
 import org.openqa.selenium.By;  
 import org.openqa.selenium.WebDriver;  
 import org.openqa.selenium.WebElement;  
 import org.openqa.selenium.ie.InternetExplorerDriver;  
 
 
 public class FindAttributes {  
      static WebDriver driver;  
      @Test
  public void testing()
  { 
   driver = new FirefoxDriver();
   driver.navigate().to("https://www.google.com");
           //calling method to get names of all the links in the Page  
           textForObjectType("link");  
           // function to validate a particular object with particular text exists in the Page  
           ValidateObjectText("link", "About");       
           //   
      }  
      public static void textForObjectType(String strObj)  
       {  
           if(strObj.toLowerCase().trim().contentEquals("link"))  
           {  
                strObj = "a";  
           }  
           if(strObj.toLowerCase().trim().contentEquals("button"))  
           {  
                strObj = "button";  
           }  
     // Similarly can add object of other types. can use enum and switch for better control.
           List<WebElement> elemLink = driver.findElements(By.tagName(strObj));  
           int intLinksinPage = elemLink.size();  
           System.out.println(intLinksinPage);  
     // Loop to get attribute value of all the objects of the type in the page
           for (int i = 0;i<intLinksinPage;i++)  
           {  
                System.out.println("The name of the link " + (i+1) +" in the page is :- " + elemLink.get(i).getAttribute("text"));  
           }  
      }  
      public static void ValidateObjectText(String strObj, String ObjName)  
       {  
           if(strObj.toLowerCase().trim().contentEquals("link"))  
           {  
                strObj = "a";  
           }  
           if(strObj.toLowerCase().trim().contentEquals("button"))  
           {  
                strObj = "button";  
           }  
           List<WebElement> elemLink = driver.findElements(By.tagName(strObj));  
           int intLinksinPage = elemLink.size();  
           System.out.println(intLinksinPage);  
           for (int i = 0;i<intLinksinPage;i++)  
           {  
                if(elemLink.get(i).getAttribute("text").contentEquals(ObjName))  
                {  
                     System.out.println("Link exists in Page with text " + elemLink.get(i).getAttribute("text"));  
                }  
           }  
      }  
 }