String MainWinHandle = driver.getWindowHandle();
for(String NewWinHandle : driver.getWindowHandles()){
// Ignore the parent window open and work with the new window frame
 if(!NewWinHandle.equals(MainWindowHandle))
  {
    driver.switchTo().window(NewWinHandle);
 //Perform the required tasks to be performed in the new window opened
 driver.close();
 }
}
//Perform action on the main window once the task is completed with the old window.
driver.switchTo().window(MainWinHandle);
Saturday, July 22, 2017
Switch between Windows using switch to in Selenium
Thursday, July 20, 2017
Job creation in Jenkins: Workflow
Below are the steps to create a new job in Jenkins:
1. Launch Jenkins by providing the url and port number of Jenkins Server.
2. Click on New Item to create a new Jenkins Job. Provide the jenkins Job Name and select the project type. Let us select a freestyle project.

5. General Section:Job Description is provided in this section. Managing different build Information and adding Parameters used in job are some of the tasks which can be defined in this section.
6. Source Code Management: This section provide instruction on how to extract latest code in the workspace, from git, svn or local system.


7. Build Trigger : This section define how the job can be triggered, Whether it is dependent on existing job or is scheduled to run on a fixed time and date periodically.
Build Environment: This section manages the build environment or workspace with option to clean the workflow before build execution or abort/fail a build if it is struck at a step for long period.
Build - This is the main section where the actual batch files/ shell command or ant targets are invoked. For testing purpose , we can invoke a maven project in this section. Executing a job means executing the commands provided in the build section.

Post Build Steps - These are post build steps and include activities like archiving artifact or sending a mail with build details or publishing testng/junit test results.
Build Environment: This section manages the build environment or workspace with option to clean the workflow before build execution or abort/fail a build if it is struck at a step for long period.
Saturday, June 17, 2017
How to execute only failed TestNG tests in Eclipse
While running testNG suite, once we are done with one round of execution of tests in the test suite, It can be helpful to execute only the failed tests during the first round of execution to reduce test failures due to flakiness/synchronization issues.
Below steps shows how to achieve this in eclipse.
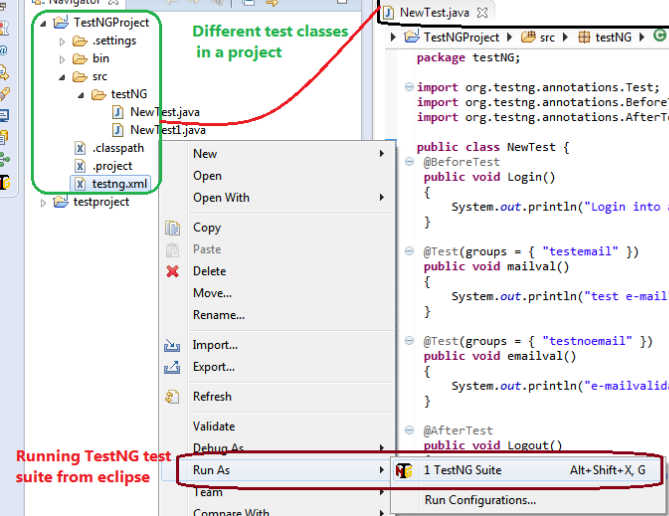
- Run the required test suite through eclipse as shown below.

- Once the execution is completed and there are failures in the execution, we may require to rerun the tests.
- Refresh the project. folder test-output should be displayed in the project explorer.
- File testng-failed.xml should be available in the folder.
- Run the test suite in similar manner as shown above, i.e Run As TestNG suite.
Subscribe to:
Posts (Atom)


